I thought I'd take a bit of time, and record some videos to introduce folks to Vray for Maya. This is mostly geared toward people already familiar with rendering with raytracers (like Mental Ray). It won't go over very basic concepts, but it will introduce vray in such a way, as to get you producing nice images with it quickly. It was initially thought of as internal training videos for my company. We get a lot of freelancers in that have experience with MR, but not with Vray. So I often spend time with them going over the same stuff over and over. So this will help everyone!
So far, only the first few are up on my youtube channel. The introduction in 2 parts, and an overview of "Nederhorst Settings" which are solid, easy-to-use and production-proven settings. I plan to add more soon. Next ones should be, the Vray Framebuffer, Materials, and Lights.
Intro Part 1
Intro Part 2
Showing posts with label mental ray. Show all posts
Showing posts with label mental ray. Show all posts
Thursday, October 14, 2010
Tuesday, August 31, 2010
Vray vs. Mental Ray
I have gotten some requests to expand on my transition to Vray so I'll take an opportunity to do so.
What sold me on Vray during early tests was its general speed at handling GI renders. Without getting into specific benchmarks, it was pretty clear to me that Vray had a substantial speed gain in complex GI scenes. The other major influence was "The Nederhorst" settings, as they have come to be known around here. These settings leverage Vray's powerful Deterministic Monte Carlo (DMC) sampler. The general idea is to minimize the amount of settings you need to tweak to affect your render quality. In production, as in life, simpler is better.
The specifics are here, but the general method is to tell Vray's sampler to be fully adaptive, so it will refine samples only in areas that need it, based on a simple contrast threshold setting. This sped up our productions significantly, as we needed to do much less tweaking to get quality renders.
This is what prompted the switch. Since then, Vray has grown in features, and I can confidently say, that it is now better integrated into Maya than MentalRay. It has added hair rendering, will render its own fur, fluids, particles, and has a much easier-to-use pass system. We consistently spit out custom channels for material id, AO, Z, normals, and other custom textures, in one neat-and-tidy render. Vray negates ever having to touch Maya's renderpass system, and makes our lives much nicer.
Another benefit is in Vray's handling of "Linear Workflow." With a click of a button, Vray will adjust all input colors/textures to any gamma you like... thus compensating for the 2.2 baked-in gamma of most textures and colors in Maya. We really don't even think about linear workflow, as we are always in it. Using the Vray Framebuffer, you can dynamically switch on sRGB compensation, to adjust your linear image to monitor-space for quick evaluations. You can plug in your own LUT, you can quickly add your own curves in the framebuffer to imitate what color treatments you may apply later. It adds linear workflow to Maya in the way it should always have been done.
Another great addition is the easy-to-use distributed rendering. We do a lot of hires print images. 5-15k. So no GI renderer on a single machine will be speedy. With a dedicated set of machines on a farm, you can toggle a button and harness many machines to attack a single frame. 5 k renders done in minutes, as buckets race across the screen. While MR standalone will allow you to do this as well, you'd have to invest the extra bucks for that, and Vray is still faster and easier to set up.
Lastly, VrayRT has appeared in beta form, and is now changing the way we light once again. We have already put it in production on our latest automotive renders, with great results. VrayRT-GPU may again change things in just a few more weeks. We look forward to using the additional horsepower already in our towers.
So, that's the sales pitch;) Really, it has been a great ride in the last year, and I thank Chaos Group for working so hard on this product.
What sold me on Vray during early tests was its general speed at handling GI renders. Without getting into specific benchmarks, it was pretty clear to me that Vray had a substantial speed gain in complex GI scenes. The other major influence was "The Nederhorst" settings, as they have come to be known around here. These settings leverage Vray's powerful Deterministic Monte Carlo (DMC) sampler. The general idea is to minimize the amount of settings you need to tweak to affect your render quality. In production, as in life, simpler is better.
The specifics are here, but the general method is to tell Vray's sampler to be fully adaptive, so it will refine samples only in areas that need it, based on a simple contrast threshold setting. This sped up our productions significantly, as we needed to do much less tweaking to get quality renders.
This is what prompted the switch. Since then, Vray has grown in features, and I can confidently say, that it is now better integrated into Maya than MentalRay. It has added hair rendering, will render its own fur, fluids, particles, and has a much easier-to-use pass system. We consistently spit out custom channels for material id, AO, Z, normals, and other custom textures, in one neat-and-tidy render. Vray negates ever having to touch Maya's renderpass system, and makes our lives much nicer.
Another benefit is in Vray's handling of "Linear Workflow." With a click of a button, Vray will adjust all input colors/textures to any gamma you like... thus compensating for the 2.2 baked-in gamma of most textures and colors in Maya. We really don't even think about linear workflow, as we are always in it. Using the Vray Framebuffer, you can dynamically switch on sRGB compensation, to adjust your linear image to monitor-space for quick evaluations. You can plug in your own LUT, you can quickly add your own curves in the framebuffer to imitate what color treatments you may apply later. It adds linear workflow to Maya in the way it should always have been done.
Another great addition is the easy-to-use distributed rendering. We do a lot of hires print images. 5-15k. So no GI renderer on a single machine will be speedy. With a dedicated set of machines on a farm, you can toggle a button and harness many machines to attack a single frame. 5 k renders done in minutes, as buckets race across the screen. While MR standalone will allow you to do this as well, you'd have to invest the extra bucks for that, and Vray is still faster and easier to set up.
Lastly, VrayRT has appeared in beta form, and is now changing the way we light once again. We have already put it in production on our latest automotive renders, with great results. VrayRT-GPU may again change things in just a few more weeks. We look forward to using the additional horsepower already in our towers.
So, that's the sales pitch;) Really, it has been a great ride in the last year, and I thank Chaos Group for working so hard on this product.

Friday, February 12, 2010
SLIK Studio Lighting Tools
Here's a link: SLIK
Now, while this seems cool, it feels a bit overkill. Here's what I like:
- ies profiles for each light. That is cool, and useful.
- high detail for the illuminant surface
- a model library of lights for when you need them.
Now I'll discuss what I think is wrong. The obvious being... that's a lot of heavy geometry for a scene where I'd prefer my heavy geo be in my product. This seems like a way to slow down fluid production. Friendly controls are ok, but really, how hard is it to adjust the intensity of a light in the lights attributes? Do I really need on-screen controls for this cluttering up my workspace?
Yes, I get that the end product could be a simple hdri... but why? Why substitute the control of individual lights for an hdri when you don't have to?
Here's a suggestion for an alternative. I wish someone would produce this so I could buy it, since I don't have time to make it all myself (hint hint, wink wink). Simply photograph lighting equipment in HDR. Then you have an accurate image (with all the detail and folds, and tape marks, and whatever floatsYerBoat). Place those images onto your area lights in MR/Vray and have fun. Light (geometrically speaking), easily adjustable, no need for models beyond cards and lights. For direct lights, ies files would be great.
SLIK seems fun, but it wouldn't really help production fluidity for me, and I do a lot of product imaging. It would be cool if you need to render the guts of a photo studio tho;)
Now, while this seems cool, it feels a bit overkill. Here's what I like:
- ies profiles for each light. That is cool, and useful.
- high detail for the illuminant surface
- a model library of lights for when you need them.
Now I'll discuss what I think is wrong. The obvious being... that's a lot of heavy geometry for a scene where I'd prefer my heavy geo be in my product. This seems like a way to slow down fluid production. Friendly controls are ok, but really, how hard is it to adjust the intensity of a light in the lights attributes? Do I really need on-screen controls for this cluttering up my workspace?
Yes, I get that the end product could be a simple hdri... but why? Why substitute the control of individual lights for an hdri when you don't have to?
Here's a suggestion for an alternative. I wish someone would produce this so I could buy it, since I don't have time to make it all myself (hint hint, wink wink). Simply photograph lighting equipment in HDR. Then you have an accurate image (with all the detail and folds, and tape marks, and whatever floatsYerBoat). Place those images onto your area lights in MR/Vray and have fun. Light (geometrically speaking), easily adjustable, no need for models beyond cards and lights. For direct lights, ies files would be great.
SLIK seems fun, but it wouldn't really help production fluidity for me, and I do a lot of product imaging. It would be cool if you need to render the guts of a photo studio tho;)
Monday, October 5, 2009
Linear Light Talk by MasterZap
As posted by Master Zap on his blog: here
He goes into some technical details of the linear-space lighting process. There are some really good explanations for what is really going on behind the scenes, and I highly recommend a listen. FXGuide has my utmost fandom at giving him some time to talk. Here is a more direct link to the podcast.
He goes into some technical details of the linear-space lighting process. There are some really good explanations for what is really going on behind the scenes, and I highly recommend a listen. FXGuide has my utmost fandom at giving him some time to talk. Here is a more direct link to the podcast.
Sunday, September 13, 2009
Vray Switch
Hey folks, I have some news. I've been testing Vray and RT over the last few weeks. And now that Vray for Maya is a reality, I can seriously consider switching. While I love 3dsmax for many things, I still feel Maya is required for many tasks, and wouldn't be without it in production. I'm getting pretty comfortable with Vray in both Max and Maya, and have to say it is a big step up from Mental Ray, which has unfortunately languished for the past few years with few useful updates.
There are things I can do in Vray, that I just couldn't accomplish properly with MentalRay. Many may argue, you can do the same quality work in MR, and short of true DOF and MB in reasonable time, I would agree. However, the man-hours required to do the same level of work are vastly different. Vray's unified DMC sampling (global glossy settings) and many other features I'll discuss later, make setting up complicated realistic settings very easy. I have already done work with vray that I doubt I could have done in twice the time in MR. saving caches, baking, importance sampling in image and area lights... the list goes on, and I have to say I wish only that I had jumped in earlier. More soon.
BTW, due to a few Russian spam comments, I've turned on posting administration. Thus your comments may take a day to show, since I have to approve them. But I'll generally let any post through that isn't spam. Even if you hurl insults;)
There are things I can do in Vray, that I just couldn't accomplish properly with MentalRay. Many may argue, you can do the same quality work in MR, and short of true DOF and MB in reasonable time, I would agree. However, the man-hours required to do the same level of work are vastly different. Vray's unified DMC sampling (global glossy settings) and many other features I'll discuss later, make setting up complicated realistic settings very easy. I have already done work with vray that I doubt I could have done in twice the time in MR. saving caches, baking, importance sampling in image and area lights... the list goes on, and I have to say I wish only that I had jumped in earlier. More soon.
BTW, due to a few Russian spam comments, I've turned on posting administration. Thus your comments may take a day to show, since I have to approve them. But I'll generally let any post through that isn't spam. Even if you hurl insults;)
Thursday, June 18, 2009
Lighting Blocking
Just a quick post to remind people I still exist;)
Thought I'd share a working method for lighting if it weren't already obvious to you (It probably is). Just like animation, blocking is an important stage. Roughing out light positions, intensities, etc. should be as fast and interactive as it can be. When dealing with say, and interior render with GI, bounces, and such, fast seems to be an oxymoron. It can be bearable, and even fun if you optimize your scene for it.
Just like blocking an animation, you don't need every feature turned on. While you can always tune your render settings, that's not what I'm talking about. I leave my FG and AA at medium. Say 75FG samples, 20 interpolation and global AA at 0 or 1 to start. Beyond that, the biggest slowdown in a render are the shaders. So use something very simple to block out lighting. a light grey mia or even a lambert. Such materials will render much faster.
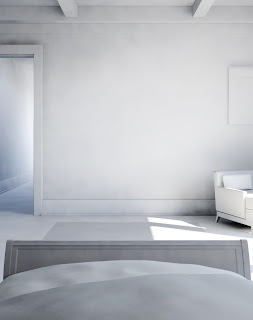 My workflow is to create a lightingBlocking renderLayer with a material override to the mentioned grey material. Start blocking lights and render iteratively, or use IPR. Blocking lights without the interference of material color is useful in 2 ways. First in speed as mentioned, but also to judge values and lighting ratios more easily. Here's an example of a blocking render for a recent job. Some clients are receptive to seeing this stage, some are not. But if nothing else, it is helpful for you to make creative judgements.
This is closer to a final blocking. In earlier iterations the bed was too dark, as was the hall. So a window was added to the hall, and a lamp (omni light) was placed at the bedside to fill the bed a bit. Ulimately, one more light was placed in the hall, and minor tweaks to some settings were required once full color and materials were added.
Thought I'd share a working method for lighting if it weren't already obvious to you (It probably is). Just like animation, blocking is an important stage. Roughing out light positions, intensities, etc. should be as fast and interactive as it can be. When dealing with say, and interior render with GI, bounces, and such, fast seems to be an oxymoron. It can be bearable, and even fun if you optimize your scene for it.
Just like blocking an animation, you don't need every feature turned on. While you can always tune your render settings, that's not what I'm talking about. I leave my FG and AA at medium. Say 75FG samples, 20 interpolation and global AA at 0 or 1 to start. Beyond that, the biggest slowdown in a render are the shaders. So use something very simple to block out lighting. a light grey mia or even a lambert. Such materials will render much faster.
 My workflow is to create a lightingBlocking renderLayer with a material override to the mentioned grey material. Start blocking lights and render iteratively, or use IPR. Blocking lights without the interference of material color is useful in 2 ways. First in speed as mentioned, but also to judge values and lighting ratios more easily. Here's an example of a blocking render for a recent job. Some clients are receptive to seeing this stage, some are not. But if nothing else, it is helpful for you to make creative judgements.
This is closer to a final blocking. In earlier iterations the bed was too dark, as was the hall. So a window was added to the hall, and a lamp (omni light) was placed at the bedside to fill the bed a bit. Ulimately, one more light was placed in the hall, and minor tweaks to some settings were required once full color and materials were added.
Wednesday, September 24, 2008
Gamma Tools 1.0
Hey folks. I mentioned I was going to post some scripted tools for inserting/removing gamma nodes. Well, here are a few.
gammaTools_1.0
Check out the readme for specific info, but here's a basic rundown. There are 3 tools (and 1 bonus for the brave).
insertGamma - inserts gamma nodes with pre-set .455 (after any selected texture nodes with color connections).
deleteGamma - deletes selected gamma nodes while retaining connections
gammaValue - changes the gamma value globally or for selected nodes. This is a command-line tool only at the moment... so the value should be entered in after the command, then executed.
There is also a hyperUserInit.mel which is a replacement for a standard maya UI script. If you choose to try this, make sure to back up the original one. This update adds the ability to insert Gamma nodes by Ctrl+Alt+Shift clicking on a connection line in the hyperShade.
These are really simple scripts. We don't have a lot of time or manpower to devote to such tools, but I'm glad Al could get these done so quickly. Thanks go to Albert (a MotR cohort) for coding.
gammaTools_1.0
Check out the readme for specific info, but here's a basic rundown. There are 3 tools (and 1 bonus for the brave).
insertGamma - inserts gamma nodes with pre-set .455 (after any selected texture nodes with color connections).
deleteGamma - deletes selected gamma nodes while retaining connections
gammaValue - changes the gamma value globally or for selected nodes. This is a command-line tool only at the moment... so the value should be entered in after the command, then executed.
There is also a hyperUserInit.mel which is a replacement for a standard maya UI script. If you choose to try this, make sure to back up the original one. This update adds the ability to insert Gamma nodes by Ctrl+Alt+Shift clicking on a connection line in the hyperShade.
These are really simple scripts. We don't have a lot of time or manpower to devote to such tools, but I'm glad Al could get these done so quickly. Thanks go to Albert (a MotR cohort) for coding.
Monday, September 22, 2008
Linear Workflow Addition 1
pixelvapour has pointed out an error with color swatch correction that I should expand on here. Thanks for kicking me in the pants to clarify this. He says that color swatches in maya are not corrected by the framebuffer setting in renderGlobals. He seems to be correct, and it may be a reason that larger studio workflows have mentioned using gamma nodes to correct just about everything in their scenes, and not the framebuffer setting. You might choose to do this, since it does avoid confusion. However, I'm still not a fan of having more nodes than I need. That said, I'll be working on some scripts that I hope to post here, that will assist in inserting/removing gamma nodes. Unfortunately, it seems a bug in MentalRay at the moment, that it does not respect nodeState "hasNoEffect". So simply turing off a gamma node doesn't work well... something I traditionally make use of in such scripts... but I digress.
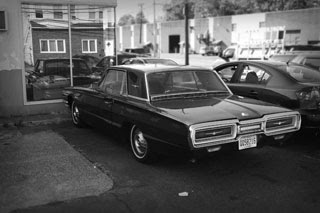
Here's some test examples to illustrate the problem. First, the defualt texture map I'll be using. It is blackAndWhite for a reason... it's just easier to visually interpret gamma differences that way.
 For these tests, I've simply created a Physical Sun/Sky system... which if you'll recall, automatically creates an exposureSimple gamma correction node on my camera. I have also set my framebuffer to 32-bit float. So we are in linear space and previews are being adjusted for monitor viewing. The scene has a texture-mapped plane with the iamge above, and a procedural checker sphere. The colors applied to the checker color swatches are pure red, and medium grey (128, 128, 128). Leaving the framebuffer gamma at a defualt of 1. We get this.
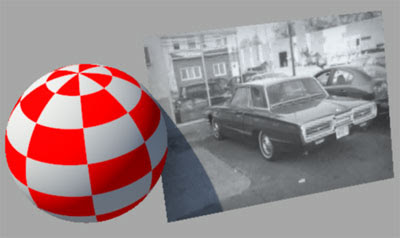 The gamma is out of whack, and may look familiar to users that aren't adjusting the framebuffer gamma. To fix this, I suggested using the framebuffer gamma setting. adjust this to .455 to avoid applying gamma twice. .455 negates the textures baked-in gamma, setting it to linear-space. The texture will now work correctly, as seen below.
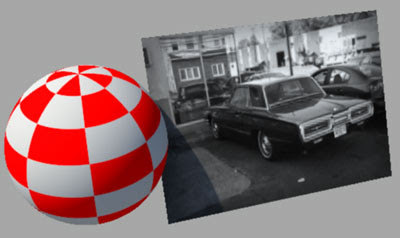
Now the texture is correct, however the procedurally mapped sphere has not changed. the mid-grey parts of the checker are not appearing close to 128,128,128. So we do have a problem here. Framebuffer gamma is not adjusting our color swatches, so we must do it manually.
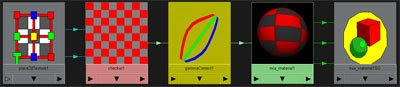

Above, we see the graph and attribs of the gamma node. Now the procedural is corrected for linear workflow, and the desired final result is this:
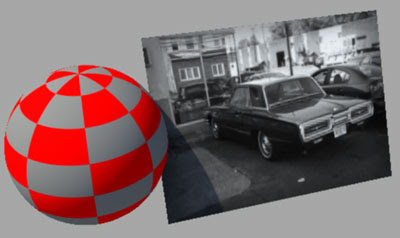 Finally! Correctness! The mid-grey renders properly.
We are clearly not working with an ideal toolset here. Maya needs some modifications to accomadate this workflow for its ussers. It would be nice to have gamma adjustments in the shader, instead of piping in a color and gamma node just to pick a color... alas. Thanks for the comments!
Here's some test examples to illustrate the problem. First, the defualt texture map I'll be using. It is blackAndWhite for a reason... it's just easier to visually interpret gamma differences that way.
 For these tests, I've simply created a Physical Sun/Sky system... which if you'll recall, automatically creates an exposureSimple gamma correction node on my camera. I have also set my framebuffer to 32-bit float. So we are in linear space and previews are being adjusted for monitor viewing. The scene has a texture-mapped plane with the iamge above, and a procedural checker sphere. The colors applied to the checker color swatches are pure red, and medium grey (128, 128, 128). Leaving the framebuffer gamma at a defualt of 1. We get this.
 The gamma is out of whack, and may look familiar to users that aren't adjusting the framebuffer gamma. To fix this, I suggested using the framebuffer gamma setting. adjust this to .455 to avoid applying gamma twice. .455 negates the textures baked-in gamma, setting it to linear-space. The texture will now work correctly, as seen below.
Now the texture is correct, however the procedurally mapped sphere has not changed. the mid-grey parts of the checker are not appearing close to 128,128,128. So we do have a problem here. Framebuffer gamma is not adjusting our color swatches, so we must do it manually.


Above, we see the graph and attribs of the gamma node. Now the procedural is corrected for linear workflow, and the desired final result is this:
 Finally! Correctness! The mid-grey renders properly.
We are clearly not working with an ideal toolset here. Maya needs some modifications to accomadate this workflow for its ussers. It would be nice to have gamma adjustments in the shader, instead of piping in a color and gamma node just to pick a color... alas. Thanks for the comments!
Sunday, September 21, 2008
Render Layers for Viewport Preview
Here's a quick tip for Maya users:
You may have had trouble with maya viewports when using MentalRay shaders. They don't always display properly in your viewports... in particuclarly when using "combined texture" previews. I despise when I see a flat black shape, unable to generate a preview. Often renderLayers compound display problems, as shaders swtich from one type to another. Honestly I haven't yet figured out all the possible combinations of issues that break proper viewport display. Often I just need to place a hilite or some other utility light, and I just cannot get a proper preview of diffuse and specular.
So, I've taken to creating a "lightingPreview" renderLayer. This one I switch to, just to see overall light levels and specular positions/intensity. I usually give it a material override, unless individual colors are important. You can obviously apply any material/s you like to get the preview you like. RenderLayers can help you clear up your viewports and see what you need to, interactively. I've been finding this more and more useful as scenes get more complicated.
You may have had trouble with maya viewports when using MentalRay shaders. They don't always display properly in your viewports... in particuclarly when using "combined texture" previews. I despise when I see a flat black shape, unable to generate a preview. Often renderLayers compound display problems, as shaders swtich from one type to another. Honestly I haven't yet figured out all the possible combinations of issues that break proper viewport display. Often I just need to place a hilite or some other utility light, and I just cannot get a proper preview of diffuse and specular.
So, I've taken to creating a "lightingPreview" renderLayer. This one I switch to, just to see overall light levels and specular positions/intensity. I usually give it a material override, unless individual colors are important. You can obviously apply any material/s you like to get the preview you like. RenderLayers can help you clear up your viewports and see what you need to, interactively. I've been finding this more and more useful as scenes get more complicated.
Sunday, September 14, 2008
Linear Workflow for Maya - Mental Ray
This is a rather large one... I hope you don't get too bored reading it;)
Since my platform is Maya/MentalRay... this will focus on that workflow. I'm sure users of MR in other apps can make good use of the info though, with a bit of modification.
The basic idea is simple. Get rid of gamma correction entirely while working in 3d, except for the preview stage. In this workflow, gamma correction is only temporarily applied during preview renders so you can see them correctly on your monitor. When you render final output for compositing, you nix the viewing gamma correction, and render in linear space to a linear format like exr, hdr, or tif(32-bit float). You need the gamma correction while previewing since your monitor responds non-linearly. Usually a simple gamma of 2.2 on the output will correct just fine, but you can use any tonemapping method available to you, if you like. Often people use 1.8 for a slightly more film-like response... so you can change the gamma preview value a bit. I'm using a simple exposure correction node on my camera in Maya to apply a gamma of 2.2.
I'll be using exr files for output, as they are a perfect balance for CG compositing use regarding file size, and dynamic range. They work in a 16-bit float space. This is NOT the same as a 16bit int that you may have worked with in Photoshop. Those files store data still as gamma encoded rgb files, with integers. They are limited in dynamic range, and are not the same as a 16-bit float exr. Float files are stored differently, and are capable of much higher dynamic range. Without getting into the specifics of the file format data, I can quote Christian Bloch's "HDRI Handbook," and tell you that 16-bit float exrs are capable of about 1 billion colors independent from the exposure. The dynamic range (exposure) can span about 32 EV's of dynamic range (stops for the photographers out there). For comparison, a common hdri photograph taken from inside a room looking out a bright window might consist of around 17 or 18 EV's. That's a lot of dynamic range. A typical 8 bit image covers about 6 EV's. The human eye, at any one time (not accounting for the eye's adaptation) can see about 14 EV's. So the exr format is very well suited for linear light storage and manipulation. Sorry for the tangent... but it was a useful one, I think.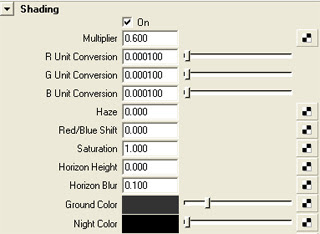
Now we get into some specific setups. At the moment, the easiest way to begin is to use the new "physical sun and sky" system. While I won't turn this post into a sun and sky tutorial, this system really forces the user to work in a linear way; since the system is physically-based. You'll find the creation option in the mental ray render globals at the bottom, under the "Environment" rollout.
When you create a physical sun/sky, you'll have an overall multiplier. I often turn this down a bit, since the default can be a bit on the high side. Other settings are not important here, but of course fine tune the look of the sun/sky system.
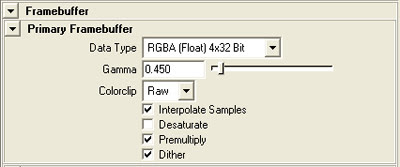 To work in a linear workflow, you'll want to output float images, so you should change your MentalRay framebuffer to "RGBA (float) 4x32bit" (again, in your mental ray render gloablas). You should also change your Gamma setting here, to .45, as shown. I'll explain. You may have tried rendering a physical sun/sky system without making these changes. You should have noticed how washed out, the textures became, since they are now being used as linear space textures. The gamma that is encoded into them (2.2) must first be removed to function properly in the linear space that sun/sky is now working in. This is a much different way of lighting than traditional cg spots;)
The Gamma setting seen above removes the encoded gamma in all textures in your scene. It does so by correcting them based on a known general rule... that bitmaps are encoded with a 2.2 gamma for screen display. See previous posts for more on that. For them to work in linear space, they are corrected with the inverse of 2.2 which is .45. If you render with these settings, your textures should render with the expected gamma/brightness/saturation that you would expect.
Note: color swatches in Maya assume you are working in a gamma 2.2 space, so they will require manual adjustments with gamma nodes. By default, they will render incorrectly without such attention. See the Linear Workflow Addition 1 post above for more detailed info.
When you created the "physical sun" system, Maya did something behind the scenes for you, to help with a linear workflow. If you graph your camera, you'll see that Maya hooked to it several new nodes. There is sun direction, physical sky, and exposure simple. The important node for us, is the exposure simple node. It is a lens shader, and remaps the rendering from linear to a gamma-corrected image. This is so you can preview output accurately. By default, it is set at a gamma of 2.2, which corresponds to the response of your monitor. So, Physical Sun and Sky automates a step for you. If you don't use the physical sun system, and still want to work in a linear workflow, you must remember to manually add an exposure lens shader to your output camera. The other exposure lens shader as of Maya2008, is the "mia_exposure_photographic." This is outside our current discussion, but if you know about photographic adjustments, then this should be fairly intuitive to use. We'll keep with a simple gamma adjust now.
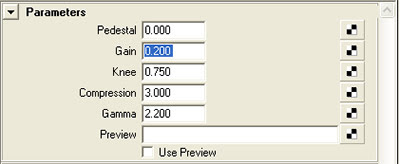 So we are now in a proper "linear preview" workflow. I'll explain a decent working method. The gain control is an exposure control. It will do the equivalent of changing f-stops on a camera. If you want a more photographically friendly interface to exposure control, you can replace the lens shader connection from "mia exposure simple" to "mia exposure photographic"
The gamma controls the output gamma for preview purposes. 2.2 is fine for a start on most monitors. changing this is a great way to fine tune the overall response and look of your image. 1.8 is sometimes used as it may give a more filmic response/look to the image. You are free to adjust this within reason, to achieve different looks. Pedistal, Knee, and Compression will have to wait for another tutorial, but they adjust white/black points of your image, etc. Most of this is better done in your image editor as final fine-tuing anyway. Getting an image close enough is fine, since we are lighting linearly, and will have a great deal of control in post, where it's easiest.
As a gneral workflow, I generally get my light positions and basic intensities set, without too much fussing over perfection. Then use the gain shown above to fine tune exposure. Obviously you must still pay careful attention to your light settings, such as sample rates, since I'm sure you'll be using advanced features for them.
Also worth mentioning, are light settings in a linear workflow. the physical sun/sky is made more friendly with a multiplier normalized to 1. Pretty easy. But when you create new standard lights you should make them physically accurate lights. The correct MR way of doing this is to add a physical light shader to your light. After doing this, your light settings are "taken over" by the shader. The intensity is now controlled by the color slot in the physical light attributes. when you double click on the color swatch, you'll see that the "value" has been given a large number (1000 I think). This is a start, to compensate for realistic light falloff over distance. You'll find that much larger values (like 100000) might be needed for more distant lights.
Once you get previews you like, it's time for final output. You must remeber that when you output to an HDR linear format such as .exr, you should remove the output gamma correction. This is in the lens shader "mia exposure simple." the 2.2 value should be set to 1, so that no correction is being applied. When you bring the final images into your image editor/compositor, you should manually apply a gamma correction such as 2.2 to get your image into proper monitor viewing space. Now, effects that you add to these float images will be more accurate, such as motion blurs, lens fx, glows, you name it. Given yor compositor (such as Fusion5) is float capable, you can make use of some very accurate fx.
Note: Having spoken to some in the industry that work in linear workflows. They have mentioned that using .45 in the renderGlobals/Framebuffer can lead to problems. They mention that .45 is too general, and can lead to incorrect gamma compensation. Also, gamma correcting the alpha or other mask channels can make for incorrect transparency edges. I would agree in very specific workflows where gamma is being very carefully controlled. The solution for them, is to leave the gamma at 1, therefore not gloabally correcting for texture gamma. They will then insert a gamma node after every texture node in the hypergraph, and correct each one individually with known vlaues. .45 might be used in many of these gamma nodes, but may not when not wanted (like mask channels, or textures with a different known gamma encoding).
I have noted that the problems with this texture-by-texture-gamma workflow is troublesome as well, since it requires much more setup time, and really only works well when you have some scripts to help you en-masse, insert, remove and edit gamma nodes. Having all these gamma nodes added can also severely reduce the hypershade performance, to the point where it lags for minutes. You can solve that with a script to toggle the hypershade updates off temporarily. You can find one I've used for that at djx blog; look for "hypershadePanel.mel." In the end I've decided on a hybrid approach. I'll use a .45 in the framebuffer which works for most textures. When I come upon a mask or texture situation where I need different settings, I'll add a gamma node to those textures only, and apply values to compensate for the differences there. It vastly cuts down on nodes, and allows for specific control when you need it.
Another note. Studios that work linearly, often have pre-render scripts to automatically toggle the lens shader gamma to 1, so the user doesn't need to remember to toggle that after all the preview work. These are often only applied when a render is submitted to the farm. Very smart. Thanks here to TJ Galda for insight on studio workflows.
Good luck folks. I hope to update this a bit more with some detailed posts. It is a large subject. Hopefully this gets you working. Let me know if you have any specific questions and I'll do my best to clarify.
Since my platform is Maya/MentalRay... this will focus on that workflow. I'm sure users of MR in other apps can make good use of the info though, with a bit of modification.
The basic idea is simple. Get rid of gamma correction entirely while working in 3d, except for the preview stage. In this workflow, gamma correction is only temporarily applied during preview renders so you can see them correctly on your monitor. When you render final output for compositing, you nix the viewing gamma correction, and render in linear space to a linear format like exr, hdr, or tif(32-bit float). You need the gamma correction while previewing since your monitor responds non-linearly. Usually a simple gamma of 2.2 on the output will correct just fine, but you can use any tonemapping method available to you, if you like. Often people use 1.8 for a slightly more film-like response... so you can change the gamma preview value a bit. I'm using a simple exposure correction node on my camera in Maya to apply a gamma of 2.2.
I'll be using exr files for output, as they are a perfect balance for CG compositing use regarding file size, and dynamic range. They work in a 16-bit float space. This is NOT the same as a 16bit int that you may have worked with in Photoshop. Those files store data still as gamma encoded rgb files, with integers. They are limited in dynamic range, and are not the same as a 16-bit float exr. Float files are stored differently, and are capable of much higher dynamic range. Without getting into the specifics of the file format data, I can quote Christian Bloch's "HDRI Handbook," and tell you that 16-bit float exrs are capable of about 1 billion colors independent from the exposure. The dynamic range (exposure) can span about 32 EV's of dynamic range (stops for the photographers out there). For comparison, a common hdri photograph taken from inside a room looking out a bright window might consist of around 17 or 18 EV's. That's a lot of dynamic range. A typical 8 bit image covers about 6 EV's. The human eye, at any one time (not accounting for the eye's adaptation) can see about 14 EV's. So the exr format is very well suited for linear light storage and manipulation. Sorry for the tangent... but it was a useful one, I think.

Now we get into some specific setups. At the moment, the easiest way to begin is to use the new "physical sun and sky" system. While I won't turn this post into a sun and sky tutorial, this system really forces the user to work in a linear way; since the system is physically-based. You'll find the creation option in the mental ray render globals at the bottom, under the "Environment" rollout.
When you create a physical sun/sky, you'll have an overall multiplier. I often turn this down a bit, since the default can be a bit on the high side. Other settings are not important here, but of course fine tune the look of the sun/sky system.
 To work in a linear workflow, you'll want to output float images, so you should change your MentalRay framebuffer to "RGBA (float) 4x32bit" (again, in your mental ray render gloablas). You should also change your Gamma setting here, to .45, as shown. I'll explain. You may have tried rendering a physical sun/sky system without making these changes. You should have noticed how washed out, the textures became, since they are now being used as linear space textures. The gamma that is encoded into them (2.2) must first be removed to function properly in the linear space that sun/sky is now working in. This is a much different way of lighting than traditional cg spots;)
The Gamma setting seen above removes the encoded gamma in all textures in your scene. It does so by correcting them based on a known general rule... that bitmaps are encoded with a 2.2 gamma for screen display. See previous posts for more on that. For them to work in linear space, they are corrected with the inverse of 2.2 which is .45. If you render with these settings, your textures should render with the expected gamma/brightness/saturation that you would expect.
Note: color swatches in Maya assume you are working in a gamma 2.2 space, so they will require manual adjustments with gamma nodes. By default, they will render incorrectly without such attention. See the Linear Workflow Addition 1 post above for more detailed info.
When you created the "physical sun" system, Maya did something behind the scenes for you, to help with a linear workflow. If you graph your camera, you'll see that Maya hooked to it several new nodes. There is sun direction, physical sky, and exposure simple. The important node for us, is the exposure simple node. It is a lens shader, and remaps the rendering from linear to a gamma-corrected image. This is so you can preview output accurately. By default, it is set at a gamma of 2.2, which corresponds to the response of your monitor. So, Physical Sun and Sky automates a step for you. If you don't use the physical sun system, and still want to work in a linear workflow, you must remember to manually add an exposure lens shader to your output camera. The other exposure lens shader as of Maya2008, is the "mia_exposure_photographic." This is outside our current discussion, but if you know about photographic adjustments, then this should be fairly intuitive to use. We'll keep with a simple gamma adjust now.
 So we are now in a proper "linear preview" workflow. I'll explain a decent working method. The gain control is an exposure control. It will do the equivalent of changing f-stops on a camera. If you want a more photographically friendly interface to exposure control, you can replace the lens shader connection from "mia exposure simple" to "mia exposure photographic"
The gamma controls the output gamma for preview purposes. 2.2 is fine for a start on most monitors. changing this is a great way to fine tune the overall response and look of your image. 1.8 is sometimes used as it may give a more filmic response/look to the image. You are free to adjust this within reason, to achieve different looks. Pedistal, Knee, and Compression will have to wait for another tutorial, but they adjust white/black points of your image, etc. Most of this is better done in your image editor as final fine-tuing anyway. Getting an image close enough is fine, since we are lighting linearly, and will have a great deal of control in post, where it's easiest.
As a gneral workflow, I generally get my light positions and basic intensities set, without too much fussing over perfection. Then use the gain shown above to fine tune exposure. Obviously you must still pay careful attention to your light settings, such as sample rates, since I'm sure you'll be using advanced features for them.
Also worth mentioning, are light settings in a linear workflow. the physical sun/sky is made more friendly with a multiplier normalized to 1. Pretty easy. But when you create new standard lights you should make them physically accurate lights. The correct MR way of doing this is to add a physical light shader to your light. After doing this, your light settings are "taken over" by the shader. The intensity is now controlled by the color slot in the physical light attributes. when you double click on the color swatch, you'll see that the "value" has been given a large number (1000 I think). This is a start, to compensate for realistic light falloff over distance. You'll find that much larger values (like 100000) might be needed for more distant lights.
Once you get previews you like, it's time for final output. You must remeber that when you output to an HDR linear format such as .exr, you should remove the output gamma correction. This is in the lens shader "mia exposure simple." the 2.2 value should be set to 1, so that no correction is being applied. When you bring the final images into your image editor/compositor, you should manually apply a gamma correction such as 2.2 to get your image into proper monitor viewing space. Now, effects that you add to these float images will be more accurate, such as motion blurs, lens fx, glows, you name it. Given yor compositor (such as Fusion5) is float capable, you can make use of some very accurate fx.
Note: Having spoken to some in the industry that work in linear workflows. They have mentioned that using .45 in the renderGlobals/Framebuffer can lead to problems. They mention that .45 is too general, and can lead to incorrect gamma compensation. Also, gamma correcting the alpha or other mask channels can make for incorrect transparency edges. I would agree in very specific workflows where gamma is being very carefully controlled. The solution for them, is to leave the gamma at 1, therefore not gloabally correcting for texture gamma. They will then insert a gamma node after every texture node in the hypergraph, and correct each one individually with known vlaues. .45 might be used in many of these gamma nodes, but may not when not wanted (like mask channels, or textures with a different known gamma encoding).
I have noted that the problems with this texture-by-texture-gamma workflow is troublesome as well, since it requires much more setup time, and really only works well when you have some scripts to help you en-masse, insert, remove and edit gamma nodes. Having all these gamma nodes added can also severely reduce the hypershade performance, to the point where it lags for minutes. You can solve that with a script to toggle the hypershade updates off temporarily. You can find one I've used for that at djx blog; look for "hypershadePanel.mel." In the end I've decided on a hybrid approach. I'll use a .45 in the framebuffer which works for most textures. When I come upon a mask or texture situation where I need different settings, I'll add a gamma node to those textures only, and apply values to compensate for the differences there. It vastly cuts down on nodes, and allows for specific control when you need it.
Another note. Studios that work linearly, often have pre-render scripts to automatically toggle the lens shader gamma to 1, so the user doesn't need to remember to toggle that after all the preview work. These are often only applied when a render is submitted to the farm. Very smart. Thanks here to TJ Galda for insight on studio workflows.
Good luck folks. I hope to update this a bit more with some detailed posts. It is a large subject. Hopefully this gets you working. Let me know if you have any specific questions and I'll do my best to clarify.
Lighting Tip: Area Light Size
Here's something I think illustrates how we always have to be open to doing things in a new way. It's not dramatic, just something that kicked me in the pants a bit. When lighting scenes with area lights, I have often made a habit of keeping their physical size down to reduce the sampling needed to smooth them out. I've been unconsciously doing that for many years. I've recently seen some renderings from maddam for which he has kindly posted some basic lighting screenshots on various forums. I noted the large scale of his area lights, and it hit me that I've been doing it wrong!
The whole purpose of large area lights is to imitate the gigantic softboxes of real-world lighting setups. They are huge for a reason... and my techie response of shrinking them to reduce sampling is just plain foolish. especially these days with faster machines. I set up an area light product shot the other day, with an enormous area light (2 actually), and high sampling both for the primary and secondary rays. You know what happed? It looked better, more realistic, and the render time wasn't bad at all. Even at 8k (for print). Man, I need to get out of the past sometimes;)
The whole purpose of large area lights is to imitate the gigantic softboxes of real-world lighting setups. They are huge for a reason... and my techie response of shrinking them to reduce sampling is just plain foolish. especially these days with faster machines. I set up an area light product shot the other day, with an enormous area light (2 actually), and high sampling both for the primary and secondary rays. You know what happed? It looked better, more realistic, and the render time wasn't bad at all. Even at 8k (for print). Man, I need to get out of the past sometimes;)
Friday, December 14, 2007
Linear Workflow Introduction
This is the first post in what may end up being a series. There's a lot to cover on the topic, but not so much I can't stuff it into a blog. Lets get started.
You probably know what the idea of a linear work flow is already, but for the sake of those that do not, here is a very brief explanation:
A linear work flow exploits the fact that your renderer works internally in float (linear) space. It generates data that 8-bit output clips away, as it is gamma encoded for monitor display. What a shame. That data is very useful in your post-production compositing and color adjusts.
If you are not familiar with the differences between 8-bit, and 32-bit (float) images, or the concept of gamma encoding for display, then you may want to study a bit before progressing. There are some great books out there to get you up to speed. The HDRI Handbook is very well written, and I would recommend it highly. Online, there are a ton of sites that discuss hdri, which in computer graphics, was the beginning of the linear work flow concept. Learn about hdri, and you'll have a much better grasp of the process.
You may wonder what the big deal is, since you've been rendering wonderful images in 8-bit for years. The big deal I suppose, comes down to a few major issues:
1. Physical accuracy
You can be as physically accurate as you want (or have the patience to deal with); all the way to real-world candelas.
2. Realistic lighting
This is a lengthy issue, but lights in CG have traditionally been "cheated" via a linear falloff, or no falloff at all. This is because the linear response of lights are not being properly gamma adjusted in normal work flows. This goes all the way back to how phong and blinn work as estimations of real lighting response. We can and should evolve beyond that with realistic materials that respond to light properly. This is the reason there are so many new MR (architectural) shaders. They are built to respond correctly in a linear work flow.
3. Greater adjustability in post
32float or 16float has the ability to deal with huge color and exposure adjustments. Given a true float compositing environment like Fusion, most filters you use will respond more realistically. Motion blurs, and glows, for example, will behave in a more natural and photographic way.
Others have posted long before this, on the process, but I have found specific information out there lacking, other than in books. So I'd like to discuss it a bit further. One great post that started as a vray-specific tutorial, has slightly expanded to mention maya/MR and others. Thanks to Robert Nederhorst for this link. It also discusses gamma, so if you're not familiar enough with that Greek letter, read this.
You probably know what the idea of a linear work flow is already, but for the sake of those that do not, here is a very brief explanation:
A linear work flow exploits the fact that your renderer works internally in float (linear) space. It generates data that 8-bit output clips away, as it is gamma encoded for monitor display. What a shame. That data is very useful in your post-production compositing and color adjusts.
If you are not familiar with the differences between 8-bit, and 32-bit (float) images, or the concept of gamma encoding for display, then you may want to study a bit before progressing. There are some great books out there to get you up to speed. The HDRI Handbook is very well written, and I would recommend it highly. Online, there are a ton of sites that discuss hdri, which in computer graphics, was the beginning of the linear work flow concept. Learn about hdri, and you'll have a much better grasp of the process.
You may wonder what the big deal is, since you've been rendering wonderful images in 8-bit for years. The big deal I suppose, comes down to a few major issues:
1. Physical accuracy
You can be as physically accurate as you want (or have the patience to deal with); all the way to real-world candelas.
2. Realistic lighting
This is a lengthy issue, but lights in CG have traditionally been "cheated" via a linear falloff, or no falloff at all. This is because the linear response of lights are not being properly gamma adjusted in normal work flows. This goes all the way back to how phong and blinn work as estimations of real lighting response. We can and should evolve beyond that with realistic materials that respond to light properly. This is the reason there are so many new MR (architectural) shaders. They are built to respond correctly in a linear work flow.
3. Greater adjustability in post
32float or 16float has the ability to deal with huge color and exposure adjustments. Given a true float compositing environment like Fusion, most filters you use will respond more realistically. Motion blurs, and glows, for example, will behave in a more natural and photographic way.
Others have posted long before this, on the process, but I have found specific information out there lacking, other than in books. So I'd like to discuss it a bit further. One great post that started as a vray-specific tutorial, has slightly expanded to mention maya/MR and others. Thanks to Robert Nederhorst for this link. It also discusses gamma, so if you're not familiar enough with that Greek letter, read this.
Sunday, December 2, 2007
motrMatteShadows Beta
So Jeff finished an internal tool for MR in Maya. It assists with using the Matte Shadow Production shader in Maya2008. To be specific, this tool automates the process outlined in Zap's Production Shader Examples. Read Zap's post to get familiar with the process. He basically outlines 2 modes of use. First, he renders the BG Plate in the shot, which we can describe as a LookDev mode. Next, some connection switching will allow for a final renderPass mode, where the BG plate is omitted. This is to generate output for later compositing.
The script below is a tool to generate and connect the required nodes automatically (setup), then easily switch between the lookDev and renderPass mode on the fly. It's not fancy, but it does the job. Also not a lot of error-checking. There is some, but if you delete the nodes it creates, the toggle will stop working. Hey, it's an early version;)
Remember, you will first need some things:
Maya2008, and you should unhide the production shaders via this cgtalk post. Otherwise, you may get missing node errors. Once you've got them unhidden, this script becomes useful. Use by placing the script into an active scripts directory on your system and typing in the command line, "motrMatteShadows 1;" 1 is for setup and lookDev mode. For the renderPass mode, type again, with a "2". I suggest creating 2 bu tons on your shelf for 1 and 2.
The first time you run it (in mode 1), it will create all the shading and camera nodes needed. Yes, it creates a new camera. Go ahead and graph it, and you will see the new connections. It also creates a matteShadow material. You should also graph that in Hypershade (and it's ShadingGroup).
While this early script creates a bunch of nodes for you, and toggles between 2 setups, it doesn't fill in all the blanks yet. We will try to work on that a bit more later. For now, you'll need to do the following steps yourself... Don't worry, they're easy:
1. After graphing the camera in Hypershade, you'll see 2 blank texture nodes. One pipes into mirrorball, and the other into cameramap. place the mirrorball image into the mirrorball texture, and your background plate into the cameramap texture. Since the same texture nodes are piped into your matteShadow material as well, this is all you really have to do.
2. You'll probably want to see the background plate in your viewport, so you'll have to make your own imagePlane for now. Use the same file you used for the cameramap texture. When rendering, you should set the alphaGain of the imagePlane to "0"
Set up your scene elements and do some test renders in mode 1. When you are happy with the overall look, set the script to mode 2 for rendering. You can toggle back and forth at any time to adjust with the bg plate in the render view.
There is a good deal to work on with this script yet. I'd like to start it with a UI, that asks right away for your mirrorball and bgPlate images. Also, it should have an option to auto-build your image plane. Perhaps in a bit. For now, I hope this is useful to someone, even in this rough state.
download
motrMatteShadows ver 0.3
(right click, save target as)
The script below is a tool to generate and connect the required nodes automatically (setup), then easily switch between the lookDev and renderPass mode on the fly. It's not fancy, but it does the job. Also not a lot of error-checking. There is some, but if you delete the nodes it creates, the toggle will stop working. Hey, it's an early version;)
Remember, you will first need some things:
Maya2008, and you should unhide the production shaders via this cgtalk post. Otherwise, you may get missing node errors. Once you've got them unhidden, this script becomes useful. Use by placing the script into an active scripts directory on your system and typing in the command line, "motrMatteShadows 1;" 1 is for setup and lookDev mode. For the renderPass mode, type again, with a "2". I suggest creating 2 bu tons on your shelf for 1 and 2.
The first time you run it (in mode 1), it will create all the shading and camera nodes needed. Yes, it creates a new camera. Go ahead and graph it, and you will see the new connections. It also creates a matteShadow material. You should also graph that in Hypershade (and it's ShadingGroup).
While this early script creates a bunch of nodes for you, and toggles between 2 setups, it doesn't fill in all the blanks yet. We will try to work on that a bit more later. For now, you'll need to do the following steps yourself... Don't worry, they're easy:
1. After graphing the camera in Hypershade, you'll see 2 blank texture nodes. One pipes into mirrorball, and the other into cameramap. place the mirrorball image into the mirrorball texture, and your background plate into the cameramap texture. Since the same texture nodes are piped into your matteShadow material as well, this is all you really have to do.
2. You'll probably want to see the background plate in your viewport, so you'll have to make your own imagePlane for now. Use the same file you used for the cameramap texture. When rendering, you should set the alphaGain of the imagePlane to "0"
Set up your scene elements and do some test renders in mode 1. When you are happy with the overall look, set the script to mode 2 for rendering. You can toggle back and forth at any time to adjust with the bg plate in the render view.
There is a good deal to work on with this script yet. I'd like to start it with a UI, that asks right away for your mirrorball and bgPlate images. Also, it should have an option to auto-build your image plane. Perhaps in a bit. For now, I hope this is useful to someone, even in this rough state.
download
motrMatteShadows ver 0.3
(right click, save target as)
Subscribe to:
Posts (Atom)