This is the first post in what may end up being a series. There's a lot to cover on the topic, but not so much I can't stuff it into a blog. Lets get started.
You probably know what the idea of a linear work flow is already, but for the sake of those that do not, here is a very brief explanation:
A linear work flow exploits the fact that your renderer works internally in float (linear) space. It generates data that 8-bit output clips away, as it is gamma encoded for monitor display. What a shame. That data is very useful in your post-production compositing and color adjusts.
If you are not familiar with the differences between 8-bit, and 32-bit (float) images, or the concept of gamma encoding for display, then you may want to study a bit before progressing. There are some great books out there to get you up to speed. The HDRI Handbook is very well written, and I would recommend it highly. Online, there are a ton of sites that discuss hdri, which in computer graphics, was the beginning of the linear work flow concept. Learn about hdri, and you'll have a much better grasp of the process.
You may wonder what the big deal is, since you've been rendering wonderful images in 8-bit for years. The big deal I suppose, comes down to a few major issues:
1. Physical accuracy
You can be as physically accurate as you want (or have the patience to deal with); all the way to real-world candelas.
2. Realistic lighting
This is a lengthy issue, but lights in CG have traditionally been "cheated" via a linear falloff, or no falloff at all. This is because the linear response of lights are not being properly gamma adjusted in normal work flows. This goes all the way back to how phong and blinn work as estimations of real lighting response. We can and should evolve beyond that with realistic materials that respond to light properly. This is the reason there are so many new MR (architectural) shaders. They are built to respond correctly in a linear work flow.
3. Greater adjustability in post
32float or 16float has the ability to deal with huge color and exposure adjustments. Given a true float compositing environment like Fusion, most filters you use will respond more realistically. Motion blurs, and glows, for example, will behave in a more natural and photographic way.
Others have posted long before this, on the process, but I have found specific information out there lacking, other than in books. So I'd like to discuss it a bit further. One great post that started as a vray-specific tutorial, has slightly expanded to mention maya/MR and others. Thanks to Robert Nederhorst for this link. It also discusses gamma, so if you're not familiar enough with that Greek letter, read this.
Friday, December 14, 2007
Sunday, December 2, 2007
motrMatteShadows Beta
So Jeff finished an internal tool for MR in Maya. It assists with using the Matte Shadow Production shader in Maya2008. To be specific, this tool automates the process outlined in Zap's Production Shader Examples. Read Zap's post to get familiar with the process. He basically outlines 2 modes of use. First, he renders the BG Plate in the shot, which we can describe as a LookDev mode. Next, some connection switching will allow for a final renderPass mode, where the BG plate is omitted. This is to generate output for later compositing.
The script below is a tool to generate and connect the required nodes automatically (setup), then easily switch between the lookDev and renderPass mode on the fly. It's not fancy, but it does the job. Also not a lot of error-checking. There is some, but if you delete the nodes it creates, the toggle will stop working. Hey, it's an early version;)
Remember, you will first need some things:
Maya2008, and you should unhide the production shaders via this cgtalk post. Otherwise, you may get missing node errors. Once you've got them unhidden, this script becomes useful. Use by placing the script into an active scripts directory on your system and typing in the command line, "motrMatteShadows 1;" 1 is for setup and lookDev mode. For the renderPass mode, type again, with a "2". I suggest creating 2 bu tons on your shelf for 1 and 2.
The first time you run it (in mode 1), it will create all the shading and camera nodes needed. Yes, it creates a new camera. Go ahead and graph it, and you will see the new connections. It also creates a matteShadow material. You should also graph that in Hypershade (and it's ShadingGroup).
While this early script creates a bunch of nodes for you, and toggles between 2 setups, it doesn't fill in all the blanks yet. We will try to work on that a bit more later. For now, you'll need to do the following steps yourself... Don't worry, they're easy:
1. After graphing the camera in Hypershade, you'll see 2 blank texture nodes. One pipes into mirrorball, and the other into cameramap. place the mirrorball image into the mirrorball texture, and your background plate into the cameramap texture. Since the same texture nodes are piped into your matteShadow material as well, this is all you really have to do.
2. You'll probably want to see the background plate in your viewport, so you'll have to make your own imagePlane for now. Use the same file you used for the cameramap texture. When rendering, you should set the alphaGain of the imagePlane to "0"
Set up your scene elements and do some test renders in mode 1. When you are happy with the overall look, set the script to mode 2 for rendering. You can toggle back and forth at any time to adjust with the bg plate in the render view.
There is a good deal to work on with this script yet. I'd like to start it with a UI, that asks right away for your mirrorball and bgPlate images. Also, it should have an option to auto-build your image plane. Perhaps in a bit. For now, I hope this is useful to someone, even in this rough state.
download
motrMatteShadows ver 0.3
(right click, save target as)
Thursday, November 29, 2007
FG Point Density Optimization
Just a quick note to help speed up hires renders that use FinalGather. The new method is easier to setup in maya 8 and 2008. Accuracy can now often be left at low levels like the default of 100 and still provide smooth results, but some things to keep in mind regarding the new method...
a point density of 1 relates to the default layout of FG points. These points are normally set in a hexagonal sort of layout (really just offset rows) every 10 pixels or so. The "Point Density" value adjusts this. The default value of 1 is usually a very fine starting place, and many may never have to change the Point Density value. However, as resolutions get larger, and much larger for print images, this can be detrimental. The number of FG points that are created is resolution dependent. The larger your image, the more FG points will be added (still every 10 pixels or so). This is normally a wise thing, as the larger you render, the more FG detail you should need.
In practice, however, you probably don't need all the FG point detail (Density) you did for your lowres tests. Something that is nice to know is the following relationship:
If you double your image size (from 640 to 1280 for example) you are squaring the number of FG points. 2x2... if you leave your density at 1. If you quarter the density to .25, you will exactly match the FG points used in your 640 render. Since the render is now larger, your FG solution will probably not be quite detailed enough. A nice compromise might be to set Point Density to .5 thereby doubling (but not squaring) your FG points. This could provide much faster FG performance for higher res renders.
1280 is not a very hires render, so this example may not provide very high quality... but it illustrates an optimization that can make a huge difference for print-res renders (if you're into that sort of thing). If I'm rendering a print res at 10x640 (or 6400 pixels wide), that's a LOT of FG points. I would plug .01 into density to match the same FG points used in my 640 test. This will obviously look poor, but the render would be very fast. Finding the right relationship may be a bit of trial and error, but there is certainly a medium number of points that will retain enough FG detail, and still allow for fast rendertimes. I might start a 6400 render at a density of .1 for a nice speed optimization.
Good luck.
Thursday, November 15, 2007
Universe = Doily?
 Every once in a while, I'm bound to post things I'm interested in, that may not be about 3d lighting...
Given the nerd factor of anyone that might read this blog, I'm guessing no-one will be bothered much. My occasional off-topic posts (like this one) should still be of interest to said readers.
This guy, Garrett Lisi seems to have a basis for a unified theory of the universe that includes gravity, does not include 11+ dimensions, and in general has simplicity and elegance that say a certain fibourous, loopy theory does not. While this article isn't heavy on the science, it is inspiring!
Sunday, November 11, 2007
Portal Light: Part 2
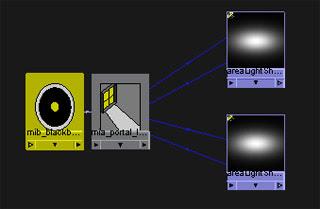
To continue my portal examples, I'll delve into it's real power. When you use mib_portal_light, you can also pipe something into its environment slot, if you want anything other than an efficient area light. A very basic example is mib_blackbody. Blackbody is a scientific term mental ray uses for color temperature. Below, blackbody is plugged into the environment slot of the portal_light.
 The temperature settings are in Kelvin. Temp settings that should be familiar are 6500 (daylight) and 2800 (tungsten - incandescent).
 6500 daylight
 2800 tungsten
 9300 tv screen
The portal light allows the entire environment both direct sun and indirect sky, to act as a soft direct light. Along with that, comes accurate area shadows as well as improved FG. The mental ray architecural docs have some great info about this and should be ingested if you want to take this further.
 The temperature settings are in Kelvin. Temp settings that should be familiar are 6500 (daylight) and 2800 (tungsten - incandescent).
 6500 daylight
 2800 tungsten
 9300 tv screen
This is a good way to imitate photographic white balance differences, but most likely, you'll just want to make pretty images with white balance set to neutral or daylight. So another more interesting example, is to use the portal light in conjunction with the physical sun/sky system. You don't have to plug it directly into the portal. This will enable higher FG accuracy with fewer rays. Below is an example.

The portal light allows the entire environment both direct sun and indirect sky, to act as a soft direct light. Along with that, comes accurate area shadows as well as improved FG. The mental ray architecural docs have some great info about this and should be ingested if you want to take this further.
Portal Light: Part 1
So, I've been fiddling with the new Portal Light shader in Maya2008. Heard about it in the promo materials, and wanted to see what it did. Well, it's pretty useful. Here's the run-down:
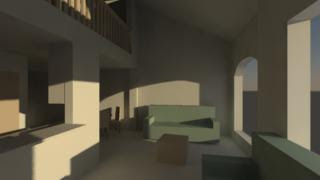
mib_portal_light functions as a tool to focus FG rays. At it's most basic level, it can improve performance and quality for the age-old architectural lighting trick of placing area lights in windows. This trick has long been a way to imitate indirect soft lighting from window sources, in an otherwise dark room. Here is an example:
 The above image uses 2 area lights scaled to the windows. Each has identical settings, as seen below. I also used a single bounce in my FG options.

So that is pretty traditional. The quality shown is low, so most users would push the FG quality up far beyond default (the above render is defualt FG settings btw). They might also use some FG filtering. Quickly your render tests will become coffee breaks with such wasted rays;)
So now for the portal light. in Maya2008, this is a light shader and should be connected to an area light. Here are the connections.
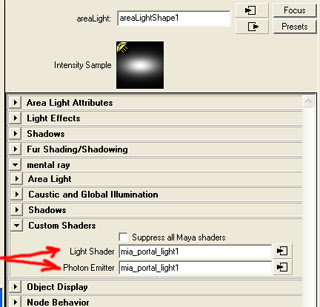
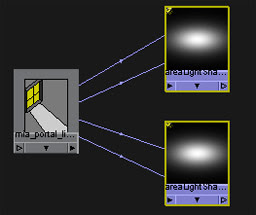
As shown, connect to both the Light shader and the Photon shader. If you plan to use GI, this is critical. We'll only really need the light shader, but do it anyway, cause it's only right;)
The portal_light now becomes the root of your light control. So I fiddled with the intensity multiplier (set to 5) to imitate the general look of my earlier area lights. The result is below. I've also reposted the original image below the new one, to compare.
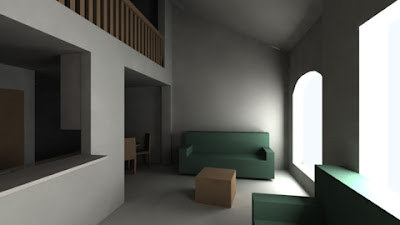
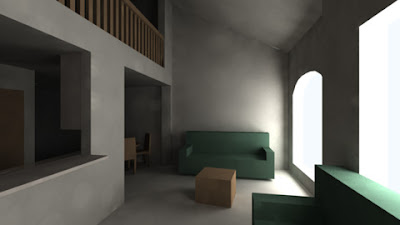
You can see the original image has FG issues like discernible ray splotchiness. The new portal image cleans up these issues with roughly the same render time.
Now, what is really going on? The portalLight's greater function is not really being touched on in this tutorial. It is meant to be used in conjunction with an environment input, like physical sky/sun. This will be covered in another post. But here, the portalLight is left without an environment input, so it defaults to a white area light. It acts as a FG focus. normally, FG will send out lots of rays that will only occasionally see the windows. Portal Light can more efficiently focus those rays. In this basic setup, it highly reduces the amount of FG rays you need for a quality architectural render. Thus its value is great, even without going any further. But further we will go...
mib_portal_light functions as a tool to focus FG rays. At it's most basic level, it can improve performance and quality for the age-old architectural lighting trick of placing area lights in windows. This trick has long been a way to imitate indirect soft lighting from window sources, in an otherwise dark room. Here is an example:
 The above image uses 2 area lights scaled to the windows. Each has identical settings, as seen below. I also used a single bounce in my FG options.
So that is pretty traditional. The quality shown is low, so most users would push the FG quality up far beyond default (the above render is defualt FG settings btw). They might also use some FG filtering. Quickly your render tests will become coffee breaks with such wasted rays;)
So now for the portal light. in Maya2008, this is a light shader and should be connected to an area light. Here are the connections.


As shown, connect to both the Light shader and the Photon shader. If you plan to use GI, this is critical. We'll only really need the light shader, but do it anyway, cause it's only right;)
The portal_light now becomes the root of your light control. So I fiddled with the intensity multiplier (set to 5) to imitate the general look of my earlier area lights. The result is below. I've also reposted the original image below the new one, to compare.


You can see the original image has FG issues like discernible ray splotchiness. The new portal image cleans up these issues with roughly the same render time.
Now, what is really going on? The portalLight's greater function is not really being touched on in this tutorial. It is meant to be used in conjunction with an environment input, like physical sky/sun. This will be covered in another post. But here, the portalLight is left without an environment input, so it defaults to a white area light. It acts as a FG focus. normally, FG will send out lots of rays that will only occasionally see the windows. Portal Light can more efficiently focus those rays. In this basic setup, it highly reduces the amount of FG rays you need for a quality architectural render. Thus its value is great, even without going any further. But further we will go...
Thursday, November 8, 2007
Jeff Lew's Killer Bean Forever
I'm truly blown away by the dedication of this guy. Jeff Lew has been around the CG world for about as long as I have. I think we're the same age. Only, I haven't made my own feature film;) Shame on me. But I must say I'm truly inspired by his 4+ year journey to make the film, Killer Bean Forever. Please, if you have any love of animation and brave auteur filmmakers, buy his film when it becomes available. For now, take a look at the trailer.

Wednesday, November 7, 2007
Gotta Love Them Crazy MentalRay Connections
So, MastaZap has a great posting about using the new matteShadow production shaders here. Thanks!. This was a good deal to digest for me the other day, and honestly, I'm not especially pleased with the workflow. Remembering those connections can be a drag. Saving them and importing is only so useful in a production, and I'm all about production efficiency...
So I'm thinking I'll script something to automate the process, with the help of our awesome in-house scriptKid Jeffrey Coe. I don't have a lot of time to script myself, but I can hand off little macroScripts to him, and he can clean it up, add a UI and make it all sorts of work.
Hopefully we'll all soon have a streamlined way to use the matteShadow shaders. I'll post it here if we get anything working decently.
Tuesday, November 6, 2007
In Honor of Those That Came Before
So, I wanted to make sure to thank some other rendering folks out there that are posting great info. If for some reason, you haven't already visited these places, I'll remind you here:
MasterZap's blog has awesome info for mentalRay users. There are so many directly useful tips there, I feel like I owe him a consulting fee;)
Also tons of great MR stuff at David Johnson's page. Of course, Zap posted about this too, but it's an impressive collection of knowledge, and I have to mention it.
Not specifically MR, but of great value is the site built and maintained by Neil Blevins. He's been around (and generously posting tutorials) for a while, and has suitably dark taste. I like.
Thanks also go to a new find. Jeff Patton's blog has plenty to keep you learning for a while.
That's it for now.
Monday, November 5, 2007
Rendering Software and Robots
So, here's some background. It's been years since I've posted anything on the web, and I feel the time has come to (try) to give back a bit, to the gigantic community of rendering crackpots. I've learned a lot from others' brave blogs, so why not add to the goodness?
I started out in 3dsMax many years ago, and have long been a huge proponent of scanline rendering. For efficiency's sake, You would think I would have evloved into Renderman. You would think wrong... so far. In 2004 or so, our studio (IDTe/DPS) switched to Maya for feature work, and I have never looked back. Eventually, mentalRay came standard and the physical accuracy was too enticing to avoid raytracing. So nowadays, I remain a raytracing fool and keep pusing mentalRay as far as I can.
In 2005, I started a company with 2 partners called "Millions of tiny Robots." It has grown steadily over the years into an exciting CG commercial and print house. We hope to grow it further into long-form animation as well. That's the short story. More later.
Sunday, November 4, 2007
Thus begins the 3dLight blog
Well, I've decided to create some blog info about my favorite stuff... lighting in 3d. It has been years since I've run the popular 3dlight.com website, and it was always a pain to update. So a blog makes more sense. 3dlight once hosted a number of tutorials and shaders that have since gone away. Perhaps I'll repost some of that old stuff... but it would need some updating. I know I'm a bit behind the times, as I'm only discovering blogs now... oh well.
Subscribe to:
Posts (Atom)