Hey folks. I mentioned I was going to post some scripted tools for inserting/removing gamma nodes. Well, here are a few.
gammaTools_1.0
Check out the readme for specific info, but here's a basic rundown. There are 3 tools (and 1 bonus for the brave).
insertGamma - inserts gamma nodes with pre-set .455 (after any selected texture nodes with color connections).
deleteGamma - deletes selected gamma nodes while retaining connections
gammaValue - changes the gamma value globally or for selected nodes. This is a command-line tool only at the moment... so the value should be entered in after the command, then executed.
There is also a hyperUserInit.mel which is a replacement for a standard maya UI script. If you choose to try this, make sure to back up the original one. This update adds the ability to insert Gamma nodes by Ctrl+Alt+Shift clicking on a connection line in the hyperShade.
These are really simple scripts. We don't have a lot of time or manpower to devote to such tools, but I'm glad Al could get these done so quickly. Thanks go to Albert (a MotR cohort) for coding.
Wednesday, September 24, 2008
Monday, September 22, 2008
Financial Woes
While I'll try to avoid political posts for the most part here (with the election coming it's been hard to keep quiet;), I have to mention this link.
The article is from DailyKos, but is very clear and level-headed. It discusses some political/financial history in a way that doesn't require you to be an economist. McCain had a hand in bringing the economy to the brink it's at now. So please read and consider. Regulations are there to protect the people. Unfortunately the supremely rich have painstakenly removed regulations over time, to the detriment of the taxpayers.
The article is from DailyKos, but is very clear and level-headed. It discusses some political/financial history in a way that doesn't require you to be an economist. McCain had a hand in bringing the economy to the brink it's at now. So please read and consider. Regulations are there to protect the people. Unfortunately the supremely rich have painstakenly removed regulations over time, to the detriment of the taxpayers.
Linear Workflow Addition 1
pixelvapour has pointed out an error with color swatch correction that I should expand on here. Thanks for kicking me in the pants to clarify this. He says that color swatches in maya are not corrected by the framebuffer setting in renderGlobals. He seems to be correct, and it may be a reason that larger studio workflows have mentioned using gamma nodes to correct just about everything in their scenes, and not the framebuffer setting. You might choose to do this, since it does avoid confusion. However, I'm still not a fan of having more nodes than I need. That said, I'll be working on some scripts that I hope to post here, that will assist in inserting/removing gamma nodes. Unfortunately, it seems a bug in MentalRay at the moment, that it does not respect nodeState "hasNoEffect". So simply turing off a gamma node doesn't work well... something I traditionally make use of in such scripts... but I digress.
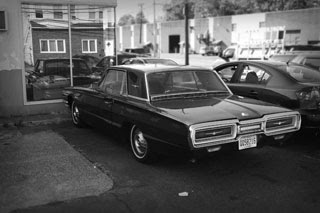
Here's some test examples to illustrate the problem. First, the defualt texture map I'll be using. It is blackAndWhite for a reason... it's just easier to visually interpret gamma differences that way.
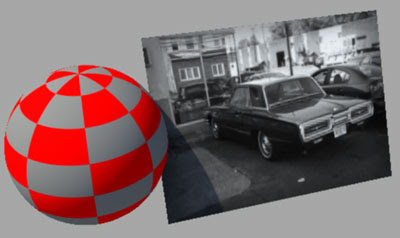
 For these tests, I've simply created a Physical Sun/Sky system... which if you'll recall, automatically creates an exposureSimple gamma correction node on my camera. I have also set my framebuffer to 32-bit float. So we are in linear space and previews are being adjusted for monitor viewing. The scene has a texture-mapped plane with the iamge above, and a procedural checker sphere. The colors applied to the checker color swatches are pure red, and medium grey (128, 128, 128). Leaving the framebuffer gamma at a defualt of 1. We get this.
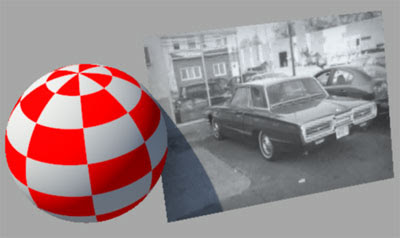 The gamma is out of whack, and may look familiar to users that aren't adjusting the framebuffer gamma. To fix this, I suggested using the framebuffer gamma setting. adjust this to .455 to avoid applying gamma twice. .455 negates the textures baked-in gamma, setting it to linear-space. The texture will now work correctly, as seen below.
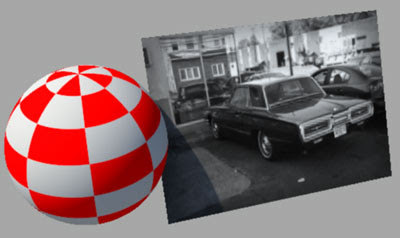
Now the texture is correct, however the procedurally mapped sphere has not changed. the mid-grey parts of the checker are not appearing close to 128,128,128. So we do have a problem here. Framebuffer gamma is not adjusting our color swatches, so we must do it manually.
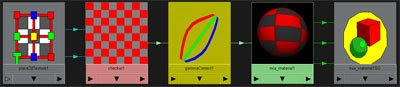

Above, we see the graph and attribs of the gamma node. Now the procedural is corrected for linear workflow, and the desired final result is this:
 Finally! Correctness! The mid-grey renders properly.
We are clearly not working with an ideal toolset here. Maya needs some modifications to accomadate this workflow for its ussers. It would be nice to have gamma adjustments in the shader, instead of piping in a color and gamma node just to pick a color... alas. Thanks for the comments!
Here's some test examples to illustrate the problem. First, the defualt texture map I'll be using. It is blackAndWhite for a reason... it's just easier to visually interpret gamma differences that way.
 For these tests, I've simply created a Physical Sun/Sky system... which if you'll recall, automatically creates an exposureSimple gamma correction node on my camera. I have also set my framebuffer to 32-bit float. So we are in linear space and previews are being adjusted for monitor viewing. The scene has a texture-mapped plane with the iamge above, and a procedural checker sphere. The colors applied to the checker color swatches are pure red, and medium grey (128, 128, 128). Leaving the framebuffer gamma at a defualt of 1. We get this.
 The gamma is out of whack, and may look familiar to users that aren't adjusting the framebuffer gamma. To fix this, I suggested using the framebuffer gamma setting. adjust this to .455 to avoid applying gamma twice. .455 negates the textures baked-in gamma, setting it to linear-space. The texture will now work correctly, as seen below.
Now the texture is correct, however the procedurally mapped sphere has not changed. the mid-grey parts of the checker are not appearing close to 128,128,128. So we do have a problem here. Framebuffer gamma is not adjusting our color swatches, so we must do it manually.


Above, we see the graph and attribs of the gamma node. Now the procedural is corrected for linear workflow, and the desired final result is this:
 Finally! Correctness! The mid-grey renders properly.
We are clearly not working with an ideal toolset here. Maya needs some modifications to accomadate this workflow for its ussers. It would be nice to have gamma adjustments in the shader, instead of piping in a color and gamma node just to pick a color... alas. Thanks for the comments!
Sunday, September 21, 2008
Render Layers for Viewport Preview
Here's a quick tip for Maya users:
You may have had trouble with maya viewports when using MentalRay shaders. They don't always display properly in your viewports... in particuclarly when using "combined texture" previews. I despise when I see a flat black shape, unable to generate a preview. Often renderLayers compound display problems, as shaders swtich from one type to another. Honestly I haven't yet figured out all the possible combinations of issues that break proper viewport display. Often I just need to place a hilite or some other utility light, and I just cannot get a proper preview of diffuse and specular.
So, I've taken to creating a "lightingPreview" renderLayer. This one I switch to, just to see overall light levels and specular positions/intensity. I usually give it a material override, unless individual colors are important. You can obviously apply any material/s you like to get the preview you like. RenderLayers can help you clear up your viewports and see what you need to, interactively. I've been finding this more and more useful as scenes get more complicated.
Sunday, September 14, 2008
New Photography
I thought I'd mention, that I've gotten a renewed interest in photography. I got a new camera (Canon Rebel XSI), and have been very pleased with the quality, even though I'm still only using the stock zoom lens. I can't wait to get some better lenses for it. But for now, I have posted a few images up at flickr. My photostream is here. Most of the images are taken as raw and tweaked using CS3's raw conversions. Really nice flexibility. One or two are HDR captures. They consist of 3 bracketed raw exposures at 2 stops difference each. Technically this is not HDR... more like MDR, but for some situations, it's all I need. Given the exposures are automated and hand-held, it's not a bad working process. For something critical, I would use a tripod and take more exposures. Here's one of my favorites.
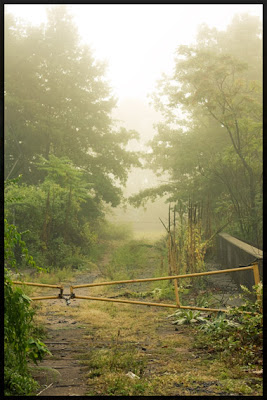

Linear Workflow for Maya - Mental Ray
This is a rather large one... I hope you don't get too bored reading it;)
Since my platform is Maya/MentalRay... this will focus on that workflow. I'm sure users of MR in other apps can make good use of the info though, with a bit of modification.
The basic idea is simple. Get rid of gamma correction entirely while working in 3d, except for the preview stage. In this workflow, gamma correction is only temporarily applied during preview renders so you can see them correctly on your monitor. When you render final output for compositing, you nix the viewing gamma correction, and render in linear space to a linear format like exr, hdr, or tif(32-bit float). You need the gamma correction while previewing since your monitor responds non-linearly. Usually a simple gamma of 2.2 on the output will correct just fine, but you can use any tonemapping method available to you, if you like. Often people use 1.8 for a slightly more film-like response... so you can change the gamma preview value a bit. I'm using a simple exposure correction node on my camera in Maya to apply a gamma of 2.2.
I'll be using exr files for output, as they are a perfect balance for CG compositing use regarding file size, and dynamic range. They work in a 16-bit float space. This is NOT the same as a 16bit int that you may have worked with in Photoshop. Those files store data still as gamma encoded rgb files, with integers. They are limited in dynamic range, and are not the same as a 16-bit float exr. Float files are stored differently, and are capable of much higher dynamic range. Without getting into the specifics of the file format data, I can quote Christian Bloch's "HDRI Handbook," and tell you that 16-bit float exrs are capable of about 1 billion colors independent from the exposure. The dynamic range (exposure) can span about 32 EV's of dynamic range (stops for the photographers out there). For comparison, a common hdri photograph taken from inside a room looking out a bright window might consist of around 17 or 18 EV's. That's a lot of dynamic range. A typical 8 bit image covers about 6 EV's. The human eye, at any one time (not accounting for the eye's adaptation) can see about 14 EV's. So the exr format is very well suited for linear light storage and manipulation. Sorry for the tangent... but it was a useful one, I think.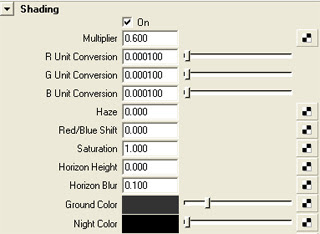
Now we get into some specific setups. At the moment, the easiest way to begin is to use the new "physical sun and sky" system. While I won't turn this post into a sun and sky tutorial, this system really forces the user to work in a linear way; since the system is physically-based. You'll find the creation option in the mental ray render globals at the bottom, under the "Environment" rollout.
When you create a physical sun/sky, you'll have an overall multiplier. I often turn this down a bit, since the default can be a bit on the high side. Other settings are not important here, but of course fine tune the look of the sun/sky system.
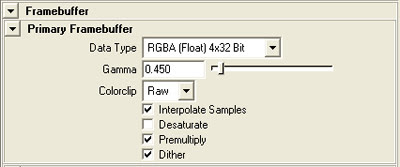 To work in a linear workflow, you'll want to output float images, so you should change your MentalRay framebuffer to "RGBA (float) 4x32bit" (again, in your mental ray render gloablas). You should also change your Gamma setting here, to .45, as shown. I'll explain. You may have tried rendering a physical sun/sky system without making these changes. You should have noticed how washed out, the textures became, since they are now being used as linear space textures. The gamma that is encoded into them (2.2) must first be removed to function properly in the linear space that sun/sky is now working in. This is a much different way of lighting than traditional cg spots;)
The Gamma setting seen above removes the encoded gamma in all textures in your scene. It does so by correcting them based on a known general rule... that bitmaps are encoded with a 2.2 gamma for screen display. See previous posts for more on that. For them to work in linear space, they are corrected with the inverse of 2.2 which is .45. If you render with these settings, your textures should render with the expected gamma/brightness/saturation that you would expect.
Note: color swatches in Maya assume you are working in a gamma 2.2 space, so they will require manual adjustments with gamma nodes. By default, they will render incorrectly without such attention. See the Linear Workflow Addition 1 post above for more detailed info.
When you created the "physical sun" system, Maya did something behind the scenes for you, to help with a linear workflow. If you graph your camera, you'll see that Maya hooked to it several new nodes. There is sun direction, physical sky, and exposure simple. The important node for us, is the exposure simple node. It is a lens shader, and remaps the rendering from linear to a gamma-corrected image. This is so you can preview output accurately. By default, it is set at a gamma of 2.2, which corresponds to the response of your monitor. So, Physical Sun and Sky automates a step for you. If you don't use the physical sun system, and still want to work in a linear workflow, you must remember to manually add an exposure lens shader to your output camera. The other exposure lens shader as of Maya2008, is the "mia_exposure_photographic." This is outside our current discussion, but if you know about photographic adjustments, then this should be fairly intuitive to use. We'll keep with a simple gamma adjust now.
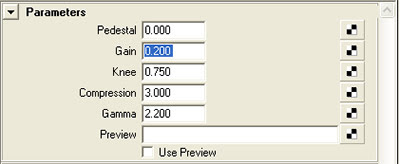 So we are now in a proper "linear preview" workflow. I'll explain a decent working method. The gain control is an exposure control. It will do the equivalent of changing f-stops on a camera. If you want a more photographically friendly interface to exposure control, you can replace the lens shader connection from "mia exposure simple" to "mia exposure photographic"
The gamma controls the output gamma for preview purposes. 2.2 is fine for a start on most monitors. changing this is a great way to fine tune the overall response and look of your image. 1.8 is sometimes used as it may give a more filmic response/look to the image. You are free to adjust this within reason, to achieve different looks. Pedistal, Knee, and Compression will have to wait for another tutorial, but they adjust white/black points of your image, etc. Most of this is better done in your image editor as final fine-tuing anyway. Getting an image close enough is fine, since we are lighting linearly, and will have a great deal of control in post, where it's easiest.
As a gneral workflow, I generally get my light positions and basic intensities set, without too much fussing over perfection. Then use the gain shown above to fine tune exposure. Obviously you must still pay careful attention to your light settings, such as sample rates, since I'm sure you'll be using advanced features for them.
Also worth mentioning, are light settings in a linear workflow. the physical sun/sky is made more friendly with a multiplier normalized to 1. Pretty easy. But when you create new standard lights you should make them physically accurate lights. The correct MR way of doing this is to add a physical light shader to your light. After doing this, your light settings are "taken over" by the shader. The intensity is now controlled by the color slot in the physical light attributes. when you double click on the color swatch, you'll see that the "value" has been given a large number (1000 I think). This is a start, to compensate for realistic light falloff over distance. You'll find that much larger values (like 100000) might be needed for more distant lights.
Once you get previews you like, it's time for final output. You must remeber that when you output to an HDR linear format such as .exr, you should remove the output gamma correction. This is in the lens shader "mia exposure simple." the 2.2 value should be set to 1, so that no correction is being applied. When you bring the final images into your image editor/compositor, you should manually apply a gamma correction such as 2.2 to get your image into proper monitor viewing space. Now, effects that you add to these float images will be more accurate, such as motion blurs, lens fx, glows, you name it. Given yor compositor (such as Fusion5) is float capable, you can make use of some very accurate fx.
Note: Having spoken to some in the industry that work in linear workflows. They have mentioned that using .45 in the renderGlobals/Framebuffer can lead to problems. They mention that .45 is too general, and can lead to incorrect gamma compensation. Also, gamma correcting the alpha or other mask channels can make for incorrect transparency edges. I would agree in very specific workflows where gamma is being very carefully controlled. The solution for them, is to leave the gamma at 1, therefore not gloabally correcting for texture gamma. They will then insert a gamma node after every texture node in the hypergraph, and correct each one individually with known vlaues. .45 might be used in many of these gamma nodes, but may not when not wanted (like mask channels, or textures with a different known gamma encoding).
I have noted that the problems with this texture-by-texture-gamma workflow is troublesome as well, since it requires much more setup time, and really only works well when you have some scripts to help you en-masse, insert, remove and edit gamma nodes. Having all these gamma nodes added can also severely reduce the hypershade performance, to the point where it lags for minutes. You can solve that with a script to toggle the hypershade updates off temporarily. You can find one I've used for that at djx blog; look for "hypershadePanel.mel." In the end I've decided on a hybrid approach. I'll use a .45 in the framebuffer which works for most textures. When I come upon a mask or texture situation where I need different settings, I'll add a gamma node to those textures only, and apply values to compensate for the differences there. It vastly cuts down on nodes, and allows for specific control when you need it.
Another note. Studios that work linearly, often have pre-render scripts to automatically toggle the lens shader gamma to 1, so the user doesn't need to remember to toggle that after all the preview work. These are often only applied when a render is submitted to the farm. Very smart. Thanks here to TJ Galda for insight on studio workflows.
Good luck folks. I hope to update this a bit more with some detailed posts. It is a large subject. Hopefully this gets you working. Let me know if you have any specific questions and I'll do my best to clarify.
Since my platform is Maya/MentalRay... this will focus on that workflow. I'm sure users of MR in other apps can make good use of the info though, with a bit of modification.
The basic idea is simple. Get rid of gamma correction entirely while working in 3d, except for the preview stage. In this workflow, gamma correction is only temporarily applied during preview renders so you can see them correctly on your monitor. When you render final output for compositing, you nix the viewing gamma correction, and render in linear space to a linear format like exr, hdr, or tif(32-bit float). You need the gamma correction while previewing since your monitor responds non-linearly. Usually a simple gamma of 2.2 on the output will correct just fine, but you can use any tonemapping method available to you, if you like. Often people use 1.8 for a slightly more film-like response... so you can change the gamma preview value a bit. I'm using a simple exposure correction node on my camera in Maya to apply a gamma of 2.2.
I'll be using exr files for output, as they are a perfect balance for CG compositing use regarding file size, and dynamic range. They work in a 16-bit float space. This is NOT the same as a 16bit int that you may have worked with in Photoshop. Those files store data still as gamma encoded rgb files, with integers. They are limited in dynamic range, and are not the same as a 16-bit float exr. Float files are stored differently, and are capable of much higher dynamic range. Without getting into the specifics of the file format data, I can quote Christian Bloch's "HDRI Handbook," and tell you that 16-bit float exrs are capable of about 1 billion colors independent from the exposure. The dynamic range (exposure) can span about 32 EV's of dynamic range (stops for the photographers out there). For comparison, a common hdri photograph taken from inside a room looking out a bright window might consist of around 17 or 18 EV's. That's a lot of dynamic range. A typical 8 bit image covers about 6 EV's. The human eye, at any one time (not accounting for the eye's adaptation) can see about 14 EV's. So the exr format is very well suited for linear light storage and manipulation. Sorry for the tangent... but it was a useful one, I think.

Now we get into some specific setups. At the moment, the easiest way to begin is to use the new "physical sun and sky" system. While I won't turn this post into a sun and sky tutorial, this system really forces the user to work in a linear way; since the system is physically-based. You'll find the creation option in the mental ray render globals at the bottom, under the "Environment" rollout.
When you create a physical sun/sky, you'll have an overall multiplier. I often turn this down a bit, since the default can be a bit on the high side. Other settings are not important here, but of course fine tune the look of the sun/sky system.
 To work in a linear workflow, you'll want to output float images, so you should change your MentalRay framebuffer to "RGBA (float) 4x32bit" (again, in your mental ray render gloablas). You should also change your Gamma setting here, to .45, as shown. I'll explain. You may have tried rendering a physical sun/sky system without making these changes. You should have noticed how washed out, the textures became, since they are now being used as linear space textures. The gamma that is encoded into them (2.2) must first be removed to function properly in the linear space that sun/sky is now working in. This is a much different way of lighting than traditional cg spots;)
The Gamma setting seen above removes the encoded gamma in all textures in your scene. It does so by correcting them based on a known general rule... that bitmaps are encoded with a 2.2 gamma for screen display. See previous posts for more on that. For them to work in linear space, they are corrected with the inverse of 2.2 which is .45. If you render with these settings, your textures should render with the expected gamma/brightness/saturation that you would expect.
Note: color swatches in Maya assume you are working in a gamma 2.2 space, so they will require manual adjustments with gamma nodes. By default, they will render incorrectly without such attention. See the Linear Workflow Addition 1 post above for more detailed info.
When you created the "physical sun" system, Maya did something behind the scenes for you, to help with a linear workflow. If you graph your camera, you'll see that Maya hooked to it several new nodes. There is sun direction, physical sky, and exposure simple. The important node for us, is the exposure simple node. It is a lens shader, and remaps the rendering from linear to a gamma-corrected image. This is so you can preview output accurately. By default, it is set at a gamma of 2.2, which corresponds to the response of your monitor. So, Physical Sun and Sky automates a step for you. If you don't use the physical sun system, and still want to work in a linear workflow, you must remember to manually add an exposure lens shader to your output camera. The other exposure lens shader as of Maya2008, is the "mia_exposure_photographic." This is outside our current discussion, but if you know about photographic adjustments, then this should be fairly intuitive to use. We'll keep with a simple gamma adjust now.
 So we are now in a proper "linear preview" workflow. I'll explain a decent working method. The gain control is an exposure control. It will do the equivalent of changing f-stops on a camera. If you want a more photographically friendly interface to exposure control, you can replace the lens shader connection from "mia exposure simple" to "mia exposure photographic"
The gamma controls the output gamma for preview purposes. 2.2 is fine for a start on most monitors. changing this is a great way to fine tune the overall response and look of your image. 1.8 is sometimes used as it may give a more filmic response/look to the image. You are free to adjust this within reason, to achieve different looks. Pedistal, Knee, and Compression will have to wait for another tutorial, but they adjust white/black points of your image, etc. Most of this is better done in your image editor as final fine-tuing anyway. Getting an image close enough is fine, since we are lighting linearly, and will have a great deal of control in post, where it's easiest.
As a gneral workflow, I generally get my light positions and basic intensities set, without too much fussing over perfection. Then use the gain shown above to fine tune exposure. Obviously you must still pay careful attention to your light settings, such as sample rates, since I'm sure you'll be using advanced features for them.
Also worth mentioning, are light settings in a linear workflow. the physical sun/sky is made more friendly with a multiplier normalized to 1. Pretty easy. But when you create new standard lights you should make them physically accurate lights. The correct MR way of doing this is to add a physical light shader to your light. After doing this, your light settings are "taken over" by the shader. The intensity is now controlled by the color slot in the physical light attributes. when you double click on the color swatch, you'll see that the "value" has been given a large number (1000 I think). This is a start, to compensate for realistic light falloff over distance. You'll find that much larger values (like 100000) might be needed for more distant lights.
Once you get previews you like, it's time for final output. You must remeber that when you output to an HDR linear format such as .exr, you should remove the output gamma correction. This is in the lens shader "mia exposure simple." the 2.2 value should be set to 1, so that no correction is being applied. When you bring the final images into your image editor/compositor, you should manually apply a gamma correction such as 2.2 to get your image into proper monitor viewing space. Now, effects that you add to these float images will be more accurate, such as motion blurs, lens fx, glows, you name it. Given yor compositor (such as Fusion5) is float capable, you can make use of some very accurate fx.
Note: Having spoken to some in the industry that work in linear workflows. They have mentioned that using .45 in the renderGlobals/Framebuffer can lead to problems. They mention that .45 is too general, and can lead to incorrect gamma compensation. Also, gamma correcting the alpha or other mask channels can make for incorrect transparency edges. I would agree in very specific workflows where gamma is being very carefully controlled. The solution for them, is to leave the gamma at 1, therefore not gloabally correcting for texture gamma. They will then insert a gamma node after every texture node in the hypergraph, and correct each one individually with known vlaues. .45 might be used in many of these gamma nodes, but may not when not wanted (like mask channels, or textures with a different known gamma encoding).
I have noted that the problems with this texture-by-texture-gamma workflow is troublesome as well, since it requires much more setup time, and really only works well when you have some scripts to help you en-masse, insert, remove and edit gamma nodes. Having all these gamma nodes added can also severely reduce the hypershade performance, to the point where it lags for minutes. You can solve that with a script to toggle the hypershade updates off temporarily. You can find one I've used for that at djx blog; look for "hypershadePanel.mel." In the end I've decided on a hybrid approach. I'll use a .45 in the framebuffer which works for most textures. When I come upon a mask or texture situation where I need different settings, I'll add a gamma node to those textures only, and apply values to compensate for the differences there. It vastly cuts down on nodes, and allows for specific control when you need it.
Another note. Studios that work linearly, often have pre-render scripts to automatically toggle the lens shader gamma to 1, so the user doesn't need to remember to toggle that after all the preview work. These are often only applied when a render is submitted to the farm. Very smart. Thanks here to TJ Galda for insight on studio workflows.
Good luck folks. I hope to update this a bit more with some detailed posts. It is a large subject. Hopefully this gets you working. Let me know if you have any specific questions and I'll do my best to clarify.
Lighting Tip: Area Light Size
Here's something I think illustrates how we always have to be open to doing things in a new way. It's not dramatic, just something that kicked me in the pants a bit. When lighting scenes with area lights, I have often made a habit of keeping their physical size down to reduce the sampling needed to smooth them out. I've been unconsciously doing that for many years. I've recently seen some renderings from maddam for which he has kindly posted some basic lighting screenshots on various forums. I noted the large scale of his area lights, and it hit me that I've been doing it wrong!
The whole purpose of large area lights is to imitate the gigantic softboxes of real-world lighting setups. They are huge for a reason... and my techie response of shrinking them to reduce sampling is just plain foolish. especially these days with faster machines. I set up an area light product shot the other day, with an enormous area light (2 actually), and high sampling both for the primary and secondary rays. You know what happed? It looked better, more realistic, and the render time wasn't bad at all. Even at 8k (for print). Man, I need to get out of the past sometimes;)
The whole purpose of large area lights is to imitate the gigantic softboxes of real-world lighting setups. They are huge for a reason... and my techie response of shrinking them to reduce sampling is just plain foolish. especially these days with faster machines. I set up an area light product shot the other day, with an enormous area light (2 actually), and high sampling both for the primary and secondary rays. You know what happed? It looked better, more realistic, and the render time wasn't bad at all. Even at 8k (for print). Man, I need to get out of the past sometimes;)
Subscribe to:
Posts (Atom)