Showing posts with label lighting. Show all posts

Monday, May 10, 2010

First Vray tests (from 1 year ago)

So, I haven't been updating very much in the past year (sorry), but here's some new info. As mentioned, I've switched to vray. This was the first thing I made while testing it (around April 2009).

Some things to note about this image:

It is an "impossible" lighting setup in the real-world, and when we are tied up in physically accurate lighting, we need to remember that lighting direction doesn't always have to follow real-world rules. The goal of this image was to recreate a particular composite of images where lighting was tuned for each specific part of the interior then combined in photoshop. The overall image works, even though lighting cues/directions are all mixed up.

There are about 30-40 rectAreaLights in the scene, split up into "zones" and there are lots of light exclusion/linking going on to keep one zone from affecting another zone. Zones were broken up into seatLeft, seatRight, Steering Wheel, Side Door, Shifter, Dashboard, and Dashboard Central. This render is just about raw from Vray, and very little has been done to it other than some retouching and minor CC.

I wouldn't call it totally finished, as there are some texture problems, and could use some post love and color grading, but this served as a great test to see how our switch to vray might go. I took about one week to produce this image, from having never used vray before. I'd say this image has some very inefficient render settings, since I wasn't quite versed, but the quality and relatively low learning curve (from MR) convinced us to make the switch.
Friday, February 12, 2010

SLIK Studio Lighting Tools

Here's a link: SLIK

Now, while this seems cool, it feels a bit overkill. Here's what I like:

- ies profiles for each light. That is cool, and useful.
- high detail for the illuminant surface
- a model library of lights for when you need them.

Now I'll discuss what I think is wrong. The obvious being... that's a lot of heavy geometry for a scene where I'd prefer my heavy geo be in my product. This seems like a way to slow down fluid production. Friendly controls are ok, but really, how hard is it to adjust the intensity of a light in the lights attributes? Do I really need on-screen controls for this cluttering up my workspace?

Yes, I get that the end product could be a simple hdri... but why? Why substitute the control of individual lights for an hdri when you don't have to?

Here's a suggestion for an alternative. I wish someone would produce this so I could buy it, since I don't have time to make it all myself (hint hint, wink wink). Simply photograph lighting equipment in HDR. Then you have an accurate image (with all the detail and folds, and tape marks, and whatever floatsYerBoat). Place those images onto your area lights in MR/Vray and have fun. Light (geometrically speaking), easily adjustable, no need for models beyond cards and lights. For direct lights, ies files would be great.

SLIK seems fun, but it wouldn't really help production fluidity for me, and I do a lot of product imaging. It would be cool if you need to render the guts of a photo studio tho;)

Monday, October 5, 2009

Linear Light Talk by MasterZap

As posted by Master Zap on his blog: here

He goes into some technical details of the linear-space lighting process. There are some really good explanations for what is really going on behind the scenes, and I highly recommend a listen. FXGuide has my utmost fandom at giving him some time to talk. Here is a more direct link to the podcast.

Thursday, June 18, 2009

Lighting Blocking

Just a quick post to remind people I still exist;)

Thought I'd share a working method for lighting if it weren't already obvious to you (It probably is). Just like animation, blocking is an important stage. Roughing out light positions, intensities, etc. should be as fast and interactive as it can be. When dealing with say, and interior render with GI, bounces, and such, fast seems to be an oxymoron. It can be bearable, and even fun if you optimize your scene for it.

Just like blocking an animation, you don't need every feature turned on. While you can always tune your render settings, that's not what I'm talking about. I leave my FG and AA at medium. Say 75FG samples, 20 interpolation and global AA at 0 or 1 to start. Beyond that, the biggest slowdown in a render are the shaders. So use something very simple to block out lighting. a light grey mia or even a lambert. Such materials will render much faster.

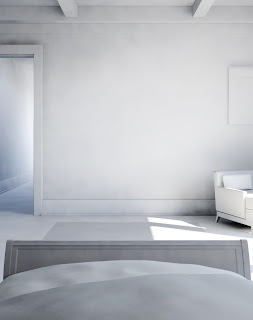
My workflow is to create a lightingBlocking renderLayer with a material override to the mentioned grey material. Start blocking lights and render iteratively, or use IPR. Blocking lights without the interference of material color is useful in 2 ways. First in speed as mentioned, but also to judge values and lighting ratios more easily. Here's an example of a blocking render for a recent job. Some clients are receptive to seeing this stage, some are not. But if nothing else, it is helpful for you to make creative judgements.

This is closer to a final blocking. In earlier iterations the bed was too dark, as was the hall. So a window was added to the hall, and a lamp (omni light) was placed at the bedside to fill the bed a bit. Ulimately, one more light was placed in the hall, and minor tweaks to some settings were required once full color and materials were added.