It has been a long while since I've posted here. Life has changed a lot, and I don't get to use Vray (or any off-the-shelf rendering software) very much anymore. Since I've been with Blue Sky for the last 1.5 years, My vray lic has lapsed, and I have had scant time to test other tools (but I have a bit).
There has been one major subject that folks have asked me about in more detail, and I just haven't gotten time to record a video for. I'd like to address that subject here as best I can, in text.
Sampling:
Vray's DMC is awesome. But it's not perfect. Sometimes, it needs help to do its work properly. I'll assume you're already familiar with the basics of DMC. If not, check out my video on the subject. The thing about DMC is that it might lead one to believe that you can control all quality in one place. For many situations, this illusion holds true. Even if it takes a bit longer to render, it saves fiddling time, so many use it that way... a master control. I may have contributed to that belief with my own videos. So I'm sorry it took me this long to explain in more detail.
In my vids, I mentioned turning the "Adaptive Amount" to 1, to allow DMC to do the work. That can be very handy, but lets get down to more serious optimizing. When you set that to 1, you are letting something happen that can unwittingly slow down your scene in some cases. There is a setting in the DMC section called "Adaptive Min Samples". For any glossy calculation (area lights, glossy reflections, gi, atmosphere, etc), this will be the starting number of samples. It defaults to 8, and in plenty of cases, this is not enough. Sometimes this is a severely undersampled starting point that will force DMC to work much too hard to overcome. That's why when using DMC, it seems like you have to lower your quality threshold super low... and still not get a clean image. Let's fix this.
side note - You could of course, just raise that "Adaptive Min Samples" setting. But that could be inefficient. You would be raising all min samples for all glossy settings, even where they are not needed. It's possibly effective, but a bit lazy, and that's not where we're going.
It would be better to determine what glossy aspect of your render is causing most of your noise and fix (up the samples on) that thing. Is it GI, a huge area light, material settings? It all depends on your scene, so there is never an out-of-the-box answer. One of the easiest ways I've found to troubleshoot a scene, and see where the noise is coming from is to render an image with a nice set of render elements to view in the vray framebuffer. You can tell a lot by seeing which elements are the noisiest.
While in a "Adaptive Amount"= 1 setup, set your threshold to a faster number like .02 or something you can stomach the rendertime. Do a render with several elements active. Include Diffuse, Specular, Reflection, GI, and Environment (if you are using it). You can also include light elements if you want to troubleshoot particular individual lights, but it isn't critical. When this finishes (or even while it's running) you can tap through the different elements, and determine which ones are the noisiest. Perhaps the diffuse and gi layers are the worst. That points to the need to raise samples on the area lights, and the gi solution. This is pretty common.
Now, change the "Adaptive Amount" setting to 0.9 . Why? This setting serves as a blend between manual sample settings and the DMC automatic threshold. If you have "Adaptive Amount" set to 1, then your area light will use the "Adaptive Min Samples" of 8 to start. If you area light is large, this may be too low a starting point to really get to a clean image quickly. The important thing to understand is that any subdivs set on glossy parameters (such as an area light) is actually set by the inverse percentage of "Adaptive Amount".
A simple example: [An area light with 10 subdivs to start] With "Adaptive Amount" set to 1, it will get 8 starting subdivs (the min default). At "Adaptive Amount" of .5 it will get 50%, or 5 subdivs to start. At "Adaptive Amount" set to .9 the light will start with only 10%, or 1 subdiv. I use "Adaptive Amount" at .9 since the math is easy; just move a decimal.
5 subdivs, 1 subdiv, or even the 8 subdivs of the DMC min setting are all sometimes too low to give the DMC sampler enough to work with. A large area light may need something more like 20 subdivs or more to give the DMC system enough tio refine. I'll often plug 250 into a light and see where that gets me. 250x10% is only 25 subdivs. This often cleans up the noise from an area light quickly. It puts more samples only where it is needed, and therefore is faster to calculate than to simply over-sample the entire image with a lower threshold. In fact, if you get your various glossy settings right, you can often get by with a higher DMC threshold, and get significantly faster renders.
In our previous example, we had noise in the area light contribution and the GI. We probably fixed the light samples now, but should also raise the GI samples. (I'm assuming Brute Force as primary). Once you start tuning each glossy parameter, you'll start to get a feel for how many more samples each one requires. Don't be afraid of some larger numbers as you are only really using 10% of whatever you enter in.
Not only can his method improve rendertimes, it can also allow you to render something clean that you simply never could with a purely adaptive dmc. One situation where this is critical is ENVfog. If you've been using fog with "Adaptive Amount"=1, then you've probably been cursing rendertimes and noise. Now with "Adaptive Amount"= .9 go set your fog subdivs to 250, and you'll get much cleaner ENVfog renders in less time. I've had scenes where fog was critical, and I raised it to 500. But rendertimes were perfectly acceptable.
A lot more info on this subject can be found at this awesome page:
Demystifying V-Ray DMC Sampler
Hopefully this helps folks tune their scenes more efficiently. I've benefited greatly from doing things this way, and think you will too. Good luck.
Sunday, March 24, 2013
Sunday, January 30, 2011
Vray for Maya: Workflow and Render Elements
This video breaks down some importnat concepts in general vray scene workflow, and also focuses on creating Render Elements to augment your renders in post.

Vray for Maya: Lights - Part1
I seem to have forgotten to update my blog with new vids for too long... here we go.
Vray for Maya: Lights - Part1
Vray for Maya: Lights - Part1
Sunday, November 7, 2010
Vray For Maya: Vray Material Part 2
Here's the 2nd part on the vray material. It covers the refractive portions of the material, some extra bits, and the very simple, blend material.
Thursday, November 4, 2010
Posted the next video in the Vray for Maya training series. This one is on the basics of the Vray Material. It had to be broken into 2 parts, so the next one touches on the Blend material, and finishes the Vray Material. Sorry to have it messy like that, but I record, and don't track my time very well;)
Tuesday, October 26, 2010
Vray for Maya: Vray Frame Buffer
This video goes over how to use the Vray Framebuffer, and its integration into Maya. Hopefully it helps your (linear) workflow.
Vray For Maya: Nederhorst Settings
This video gets you up-and-running with some production-proven render settings originally outlined by Robert Nederhorst. Thanks to him, and the Chaos Group team, we have some really useful and simple ways to render complex scenes. It may look a bit tricky at first to set it up, but by all means, save it a preset. I use a preset and apply it at the start of my scene, then set the vray common attribs afterward. You can also text edit the preset, and comment out all the bits that modify the common tab.
Thursday, October 14, 2010
Vray Training Videos
I thought I'd take a bit of time, and record some videos to introduce folks to Vray for Maya. This is mostly geared toward people already familiar with rendering with raytracers (like Mental Ray). It won't go over very basic concepts, but it will introduce vray in such a way, as to get you producing nice images with it quickly. It was initially thought of as internal training videos for my company. We get a lot of freelancers in that have experience with MR, but not with Vray. So I often spend time with them going over the same stuff over and over. So this will help everyone!
So far, only the first few are up on my youtube channel. The introduction in 2 parts, and an overview of "Nederhorst Settings" which are solid, easy-to-use and production-proven settings. I plan to add more soon. Next ones should be, the Vray Framebuffer, Materials, and Lights.
Intro Part 1
Intro Part 2
So far, only the first few are up on my youtube channel. The introduction in 2 parts, and an overview of "Nederhorst Settings" which are solid, easy-to-use and production-proven settings. I plan to add more soon. Next ones should be, the Vray Framebuffer, Materials, and Lights.
Intro Part 1
Intro Part 2
Tuesday, August 31, 2010
Arnold, My Old Friend
Marcos, the creator of the Arnold renderer in use at Sony Pictures Imageworks was recently interviewed. Fun read. In an email conversation with him, he pointed out some recent papers he was directly and indirectly involved with. They too are worth reading if you are into raytracing.
Physically-Based Shading and Lighting at SPI
Siggraph 2010: Course on Global Illumination
And for added fun, here are some wayback renders done in the early versions of Arnold for 3dsmax. Some of which I did;)
Physically-Based Shading and Lighting at SPI
Siggraph 2010: Course on Global Illumination
And for added fun, here are some wayback renders done in the early versions of Arnold for 3dsmax. Some of which I did;)
Vray vs. Mental Ray
I have gotten some requests to expand on my transition to Vray so I'll take an opportunity to do so.
What sold me on Vray during early tests was its general speed at handling GI renders. Without getting into specific benchmarks, it was pretty clear to me that Vray had a substantial speed gain in complex GI scenes. The other major influence was "The Nederhorst" settings, as they have come to be known around here. These settings leverage Vray's powerful Deterministic Monte Carlo (DMC) sampler. The general idea is to minimize the amount of settings you need to tweak to affect your render quality. In production, as in life, simpler is better.
The specifics are here, but the general method is to tell Vray's sampler to be fully adaptive, so it will refine samples only in areas that need it, based on a simple contrast threshold setting. This sped up our productions significantly, as we needed to do much less tweaking to get quality renders.
This is what prompted the switch. Since then, Vray has grown in features, and I can confidently say, that it is now better integrated into Maya than MentalRay. It has added hair rendering, will render its own fur, fluids, particles, and has a much easier-to-use pass system. We consistently spit out custom channels for material id, AO, Z, normals, and other custom textures, in one neat-and-tidy render. Vray negates ever having to touch Maya's renderpass system, and makes our lives much nicer.
Another benefit is in Vray's handling of "Linear Workflow." With a click of a button, Vray will adjust all input colors/textures to any gamma you like... thus compensating for the 2.2 baked-in gamma of most textures and colors in Maya. We really don't even think about linear workflow, as we are always in it. Using the Vray Framebuffer, you can dynamically switch on sRGB compensation, to adjust your linear image to monitor-space for quick evaluations. You can plug in your own LUT, you can quickly add your own curves in the framebuffer to imitate what color treatments you may apply later. It adds linear workflow to Maya in the way it should always have been done.
Another great addition is the easy-to-use distributed rendering. We do a lot of hires print images. 5-15k. So no GI renderer on a single machine will be speedy. With a dedicated set of machines on a farm, you can toggle a button and harness many machines to attack a single frame. 5 k renders done in minutes, as buckets race across the screen. While MR standalone will allow you to do this as well, you'd have to invest the extra bucks for that, and Vray is still faster and easier to set up.
Lastly, VrayRT has appeared in beta form, and is now changing the way we light once again. We have already put it in production on our latest automotive renders, with great results. VrayRT-GPU may again change things in just a few more weeks. We look forward to using the additional horsepower already in our towers.
So, that's the sales pitch;) Really, it has been a great ride in the last year, and I thank Chaos Group for working so hard on this product.
What sold me on Vray during early tests was its general speed at handling GI renders. Without getting into specific benchmarks, it was pretty clear to me that Vray had a substantial speed gain in complex GI scenes. The other major influence was "The Nederhorst" settings, as they have come to be known around here. These settings leverage Vray's powerful Deterministic Monte Carlo (DMC) sampler. The general idea is to minimize the amount of settings you need to tweak to affect your render quality. In production, as in life, simpler is better.
The specifics are here, but the general method is to tell Vray's sampler to be fully adaptive, so it will refine samples only in areas that need it, based on a simple contrast threshold setting. This sped up our productions significantly, as we needed to do much less tweaking to get quality renders.
This is what prompted the switch. Since then, Vray has grown in features, and I can confidently say, that it is now better integrated into Maya than MentalRay. It has added hair rendering, will render its own fur, fluids, particles, and has a much easier-to-use pass system. We consistently spit out custom channels for material id, AO, Z, normals, and other custom textures, in one neat-and-tidy render. Vray negates ever having to touch Maya's renderpass system, and makes our lives much nicer.
Another benefit is in Vray's handling of "Linear Workflow." With a click of a button, Vray will adjust all input colors/textures to any gamma you like... thus compensating for the 2.2 baked-in gamma of most textures and colors in Maya. We really don't even think about linear workflow, as we are always in it. Using the Vray Framebuffer, you can dynamically switch on sRGB compensation, to adjust your linear image to monitor-space for quick evaluations. You can plug in your own LUT, you can quickly add your own curves in the framebuffer to imitate what color treatments you may apply later. It adds linear workflow to Maya in the way it should always have been done.
Another great addition is the easy-to-use distributed rendering. We do a lot of hires print images. 5-15k. So no GI renderer on a single machine will be speedy. With a dedicated set of machines on a farm, you can toggle a button and harness many machines to attack a single frame. 5 k renders done in minutes, as buckets race across the screen. While MR standalone will allow you to do this as well, you'd have to invest the extra bucks for that, and Vray is still faster and easier to set up.
Lastly, VrayRT has appeared in beta form, and is now changing the way we light once again. We have already put it in production on our latest automotive renders, with great results. VrayRT-GPU may again change things in just a few more weeks. We look forward to using the additional horsepower already in our towers.
So, that's the sales pitch;) Really, it has been a great ride in the last year, and I thank Chaos Group for working so hard on this product.
Monday, May 10, 2010
First Vray tests (from 1 year ago)
 So, I haven't been updating very much in the past year (sorry), but here's some new info. As mentioned, I've switched to vray. This was the first thing I made while testing it (around April 2009).
Some things to note about this image:
It is an "impossible" lighting setup in the real-world, and when we are tied up in physically accurate lighting, we need to remember that lighting direction doesn't always have to follow real-world rules. The goal of this image was to recreate a particular composite of images where lighting was tuned for each specific part of the interior then combined in photoshop. The overall image works, even though lighting cues/directions are all mixed up.
There are about 30-40 rectAreaLights in the scene, split up into "zones" and there are lots of light exclusion/linking going on to keep one zone from affecting another zone. Zones were broken up into seatLeft, seatRight, Steering Wheel, Side Door, Shifter, Dashboard, and Dashboard Central. This render is just about raw from Vray, and very little has been done to it other than some retouching and minor CC.
I wouldn't call it totally finished, as there are some texture problems, and could use some post love and color grading, but this served as a great test to see how our switch to vray might go. I took about one week to produce this image, from having never used vray before. I'd say this image has some very inefficient render settings, since I wasn't quite versed, but the quality and relatively low learning curve (from MR) convinced us to make the switch.
Friday, February 12, 2010
SLIK Studio Lighting Tools
Here's a link: SLIK
Now, while this seems cool, it feels a bit overkill. Here's what I like:
- ies profiles for each light. That is cool, and useful.
- high detail for the illuminant surface
- a model library of lights for when you need them.
Now I'll discuss what I think is wrong. The obvious being... that's a lot of heavy geometry for a scene where I'd prefer my heavy geo be in my product. This seems like a way to slow down fluid production. Friendly controls are ok, but really, how hard is it to adjust the intensity of a light in the lights attributes? Do I really need on-screen controls for this cluttering up my workspace?
Yes, I get that the end product could be a simple hdri... but why? Why substitute the control of individual lights for an hdri when you don't have to?
Here's a suggestion for an alternative. I wish someone would produce this so I could buy it, since I don't have time to make it all myself (hint hint, wink wink). Simply photograph lighting equipment in HDR. Then you have an accurate image (with all the detail and folds, and tape marks, and whatever floatsYerBoat). Place those images onto your area lights in MR/Vray and have fun. Light (geometrically speaking), easily adjustable, no need for models beyond cards and lights. For direct lights, ies files would be great.
SLIK seems fun, but it wouldn't really help production fluidity for me, and I do a lot of product imaging. It would be cool if you need to render the guts of a photo studio tho;)
Now, while this seems cool, it feels a bit overkill. Here's what I like:
- ies profiles for each light. That is cool, and useful.
- high detail for the illuminant surface
- a model library of lights for when you need them.
Now I'll discuss what I think is wrong. The obvious being... that's a lot of heavy geometry for a scene where I'd prefer my heavy geo be in my product. This seems like a way to slow down fluid production. Friendly controls are ok, but really, how hard is it to adjust the intensity of a light in the lights attributes? Do I really need on-screen controls for this cluttering up my workspace?
Yes, I get that the end product could be a simple hdri... but why? Why substitute the control of individual lights for an hdri when you don't have to?
Here's a suggestion for an alternative. I wish someone would produce this so I could buy it, since I don't have time to make it all myself (hint hint, wink wink). Simply photograph lighting equipment in HDR. Then you have an accurate image (with all the detail and folds, and tape marks, and whatever floatsYerBoat). Place those images onto your area lights in MR/Vray and have fun. Light (geometrically speaking), easily adjustable, no need for models beyond cards and lights. For direct lights, ies files would be great.
SLIK seems fun, but it wouldn't really help production fluidity for me, and I do a lot of product imaging. It would be cool if you need to render the guts of a photo studio tho;)
Monday, October 5, 2009
Linear Light Talk by MasterZap
As posted by Master Zap on his blog: here
He goes into some technical details of the linear-space lighting process. There are some really good explanations for what is really going on behind the scenes, and I highly recommend a listen. FXGuide has my utmost fandom at giving him some time to talk. Here is a more direct link to the podcast.
He goes into some technical details of the linear-space lighting process. There are some really good explanations for what is really going on behind the scenes, and I highly recommend a listen. FXGuide has my utmost fandom at giving him some time to talk. Here is a more direct link to the podcast.
Sunday, September 13, 2009
Vray Switch
Hey folks, I have some news. I've been testing Vray and RT over the last few weeks. And now that Vray for Maya is a reality, I can seriously consider switching. While I love 3dsmax for many things, I still feel Maya is required for many tasks, and wouldn't be without it in production. I'm getting pretty comfortable with Vray in both Max and Maya, and have to say it is a big step up from Mental Ray, which has unfortunately languished for the past few years with few useful updates.
There are things I can do in Vray, that I just couldn't accomplish properly with MentalRay. Many may argue, you can do the same quality work in MR, and short of true DOF and MB in reasonable time, I would agree. However, the man-hours required to do the same level of work are vastly different. Vray's unified DMC sampling (global glossy settings) and many other features I'll discuss later, make setting up complicated realistic settings very easy. I have already done work with vray that I doubt I could have done in twice the time in MR. saving caches, baking, importance sampling in image and area lights... the list goes on, and I have to say I wish only that I had jumped in earlier. More soon.
BTW, due to a few Russian spam comments, I've turned on posting administration. Thus your comments may take a day to show, since I have to approve them. But I'll generally let any post through that isn't spam. Even if you hurl insults;)
There are things I can do in Vray, that I just couldn't accomplish properly with MentalRay. Many may argue, you can do the same quality work in MR, and short of true DOF and MB in reasonable time, I would agree. However, the man-hours required to do the same level of work are vastly different. Vray's unified DMC sampling (global glossy settings) and many other features I'll discuss later, make setting up complicated realistic settings very easy. I have already done work with vray that I doubt I could have done in twice the time in MR. saving caches, baking, importance sampling in image and area lights... the list goes on, and I have to say I wish only that I had jumped in earlier. More soon.
BTW, due to a few Russian spam comments, I've turned on posting administration. Thus your comments may take a day to show, since I have to approve them. But I'll generally let any post through that isn't spam. Even if you hurl insults;)
Thursday, June 18, 2009
Lighting Blocking
Just a quick post to remind people I still exist;)
Thought I'd share a working method for lighting if it weren't already obvious to you (It probably is). Just like animation, blocking is an important stage. Roughing out light positions, intensities, etc. should be as fast and interactive as it can be. When dealing with say, and interior render with GI, bounces, and such, fast seems to be an oxymoron. It can be bearable, and even fun if you optimize your scene for it.
Just like blocking an animation, you don't need every feature turned on. While you can always tune your render settings, that's not what I'm talking about. I leave my FG and AA at medium. Say 75FG samples, 20 interpolation and global AA at 0 or 1 to start. Beyond that, the biggest slowdown in a render are the shaders. So use something very simple to block out lighting. a light grey mia or even a lambert. Such materials will render much faster.
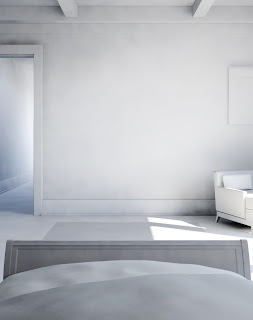 My workflow is to create a lightingBlocking renderLayer with a material override to the mentioned grey material. Start blocking lights and render iteratively, or use IPR. Blocking lights without the interference of material color is useful in 2 ways. First in speed as mentioned, but also to judge values and lighting ratios more easily. Here's an example of a blocking render for a recent job. Some clients are receptive to seeing this stage, some are not. But if nothing else, it is helpful for you to make creative judgements.
This is closer to a final blocking. In earlier iterations the bed was too dark, as was the hall. So a window was added to the hall, and a lamp (omni light) was placed at the bedside to fill the bed a bit. Ulimately, one more light was placed in the hall, and minor tweaks to some settings were required once full color and materials were added.
Thought I'd share a working method for lighting if it weren't already obvious to you (It probably is). Just like animation, blocking is an important stage. Roughing out light positions, intensities, etc. should be as fast and interactive as it can be. When dealing with say, and interior render with GI, bounces, and such, fast seems to be an oxymoron. It can be bearable, and even fun if you optimize your scene for it.
Just like blocking an animation, you don't need every feature turned on. While you can always tune your render settings, that's not what I'm talking about. I leave my FG and AA at medium. Say 75FG samples, 20 interpolation and global AA at 0 or 1 to start. Beyond that, the biggest slowdown in a render are the shaders. So use something very simple to block out lighting. a light grey mia or even a lambert. Such materials will render much faster.
 My workflow is to create a lightingBlocking renderLayer with a material override to the mentioned grey material. Start blocking lights and render iteratively, or use IPR. Blocking lights without the interference of material color is useful in 2 ways. First in speed as mentioned, but also to judge values and lighting ratios more easily. Here's an example of a blocking render for a recent job. Some clients are receptive to seeing this stage, some are not. But if nothing else, it is helpful for you to make creative judgements.
This is closer to a final blocking. In earlier iterations the bed was too dark, as was the hall. So a window was added to the hall, and a lamp (omni light) was placed at the bedside to fill the bed a bit. Ulimately, one more light was placed in the hall, and minor tweaks to some settings were required once full color and materials were added.
Friday, March 6, 2009
Liza Lee Music
Not that I secretly desire to sell or review music;)... but I would like to post a big kudos to my friend Liza who has released her second album, Anima. It's a Jazz album, and let's face it, I'm not a Jazz sort of guy, but she is highly influenced by some of my old favs... Kate Bush, Tori Amos, David Bowie... so there are more melodic aspects to this album that stretch its fingers well outside what scares me about Jazz. I'm proud of her work on this, and hope people discover her music. She is also coming out with a more alt-pop styled album soon, so keep a look out.
Nice thing about this release, is that all proceeds go to the Society for Womens' Health Research. So buy it dammit!
You can get it on amazon and cdbaby... my bias is for amazon, nice and clean insta-downloads with no crappy drm.
Nice thing about this release, is that all proceeds go to the Society for Womens' Health Research. So buy it dammit!
You can get it on amazon and cdbaby... my bias is for amazon, nice and clean insta-downloads with no crappy drm.
Monday, October 20, 2008
A.A.W.W.

On Thursday afternoon (Oct 16th) at 11:56am, my wife and I became the proud parents of a perfect baby boy. Aaron Andrew "Woden" Weidenhammer was larger than expected... 8lb 1.3oz and 21in long. This is our first one and we are going nuts with all the new responsibility and lack of sleep, but all is well, and he's as cute as we could imagine.

Wednesday, September 24, 2008
Gamma Tools 1.0
Hey folks. I mentioned I was going to post some scripted tools for inserting/removing gamma nodes. Well, here are a few.
gammaTools_1.0
Check out the readme for specific info, but here's a basic rundown. There are 3 tools (and 1 bonus for the brave).
insertGamma - inserts gamma nodes with pre-set .455 (after any selected texture nodes with color connections).
deleteGamma - deletes selected gamma nodes while retaining connections
gammaValue - changes the gamma value globally or for selected nodes. This is a command-line tool only at the moment... so the value should be entered in after the command, then executed.
There is also a hyperUserInit.mel which is a replacement for a standard maya UI script. If you choose to try this, make sure to back up the original one. This update adds the ability to insert Gamma nodes by Ctrl+Alt+Shift clicking on a connection line in the hyperShade.
These are really simple scripts. We don't have a lot of time or manpower to devote to such tools, but I'm glad Al could get these done so quickly. Thanks go to Albert (a MotR cohort) for coding.
gammaTools_1.0
Check out the readme for specific info, but here's a basic rundown. There are 3 tools (and 1 bonus for the brave).
insertGamma - inserts gamma nodes with pre-set .455 (after any selected texture nodes with color connections).
deleteGamma - deletes selected gamma nodes while retaining connections
gammaValue - changes the gamma value globally or for selected nodes. This is a command-line tool only at the moment... so the value should be entered in after the command, then executed.
There is also a hyperUserInit.mel which is a replacement for a standard maya UI script. If you choose to try this, make sure to back up the original one. This update adds the ability to insert Gamma nodes by Ctrl+Alt+Shift clicking on a connection line in the hyperShade.
These are really simple scripts. We don't have a lot of time or manpower to devote to such tools, but I'm glad Al could get these done so quickly. Thanks go to Albert (a MotR cohort) for coding.
Monday, September 22, 2008
Financial Woes
While I'll try to avoid political posts for the most part here (with the election coming it's been hard to keep quiet;), I have to mention this link.
The article is from DailyKos, but is very clear and level-headed. It discusses some political/financial history in a way that doesn't require you to be an economist. McCain had a hand in bringing the economy to the brink it's at now. So please read and consider. Regulations are there to protect the people. Unfortunately the supremely rich have painstakenly removed regulations over time, to the detriment of the taxpayers.
The article is from DailyKos, but is very clear and level-headed. It discusses some political/financial history in a way that doesn't require you to be an economist. McCain had a hand in bringing the economy to the brink it's at now. So please read and consider. Regulations are there to protect the people. Unfortunately the supremely rich have painstakenly removed regulations over time, to the detriment of the taxpayers.
Subscribe to:
Posts (Atom)